SpringSecurity
简介
Spring Security是Spring家族中的一个安全管理框架。相比与另外一个安全框架Shiro,它提供了更丰富的功能,社区资源也比Shiro丰富。
一般来说中大型的项目都是使用SpringSecurity来做安全框架。小项目有Shiro的比较多,因为相比与SpringSecurity,Shiro的上手更加的简单。
一般Web应用的需要进行认证和授权。
认证:验证当前访问系统的是不是本系统的用户,并且要确认具体是哪个
用户授权:经过认证后判断当前用户是否有权限进行某个操作
而认证和授权也是SpringSecurity作为安全框架的核心功能。
SpringSecurity整合Springboot
首先导入Springboot相关依赖
1
2
3
4
5
6
7
8
9
10
11
12
13
14
15
16
17
18
| <parent>
<groupId>org.springframework.boot</groupId>
<artifactId>spring-boot-starter-parent</artifactId>
<version>2.5.0</version>
</parent>
<dependencies>
<dependency>
<groupId>org.springframework.boot</groupId>
<artifactId>spring-boot-starter-web</artifactId>
</dependency>
<dependency>
<groupId>org.projectlombok</groupId>
<artifactId>lombok</artifactId>
<optional>true</optional>
</dependency>
</dependencies>
|
SpringSecurity依赖
1
2
3
4
5
|
<dependency>
<groupId>org.springframework.boot</groupId>
<artifactId>spring-boot-starter-security</artifactId>
</dependency>
|
引入SpringSecurity我们重启项目,访问localhost:8080会发现直接跳转到登录页面了
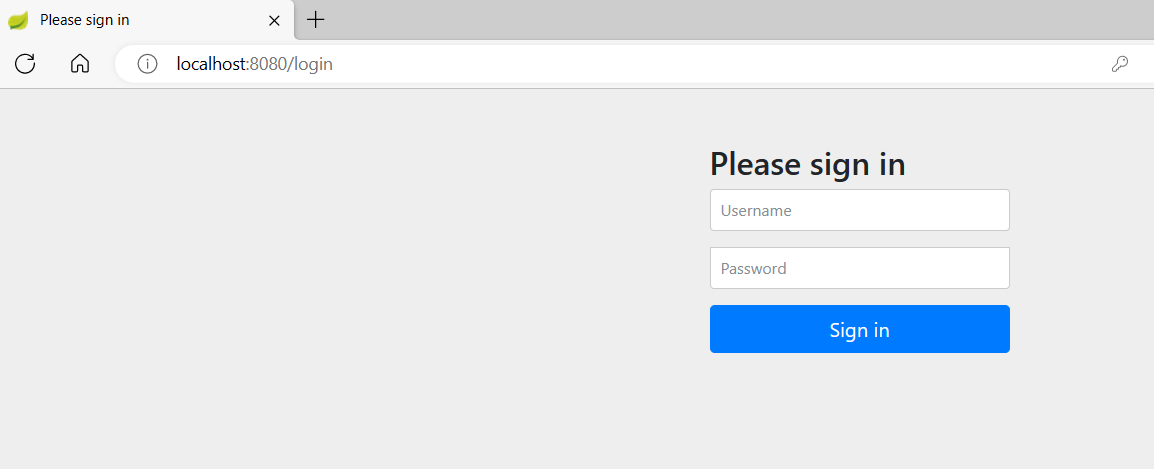
我们访问其他路径时无法访问,请求被页面拦截下来了
控制台会自动输出

用户名为user
完成登录

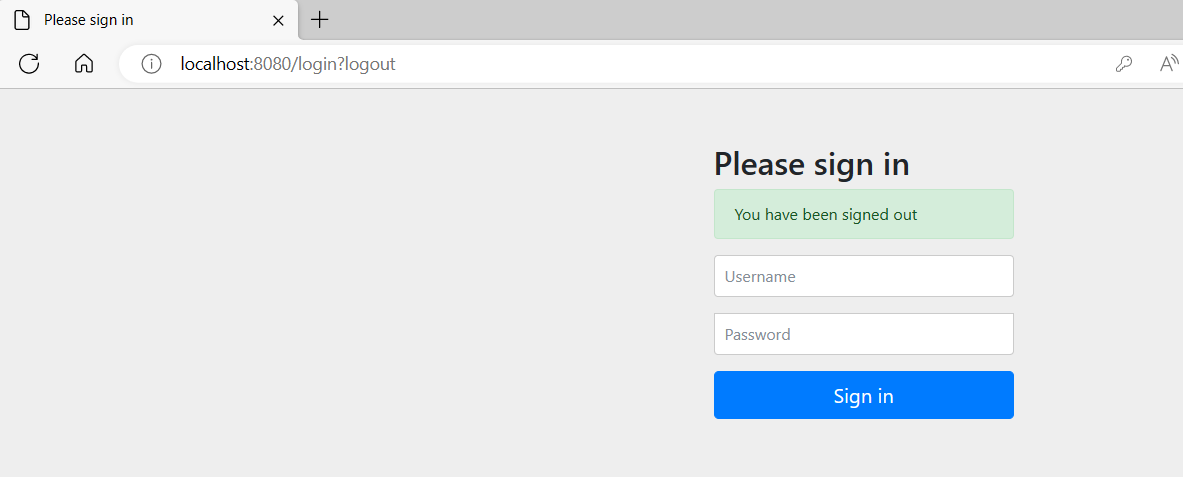
地址栏中输入localhost:8080/logout

当我们Log Out后
认证
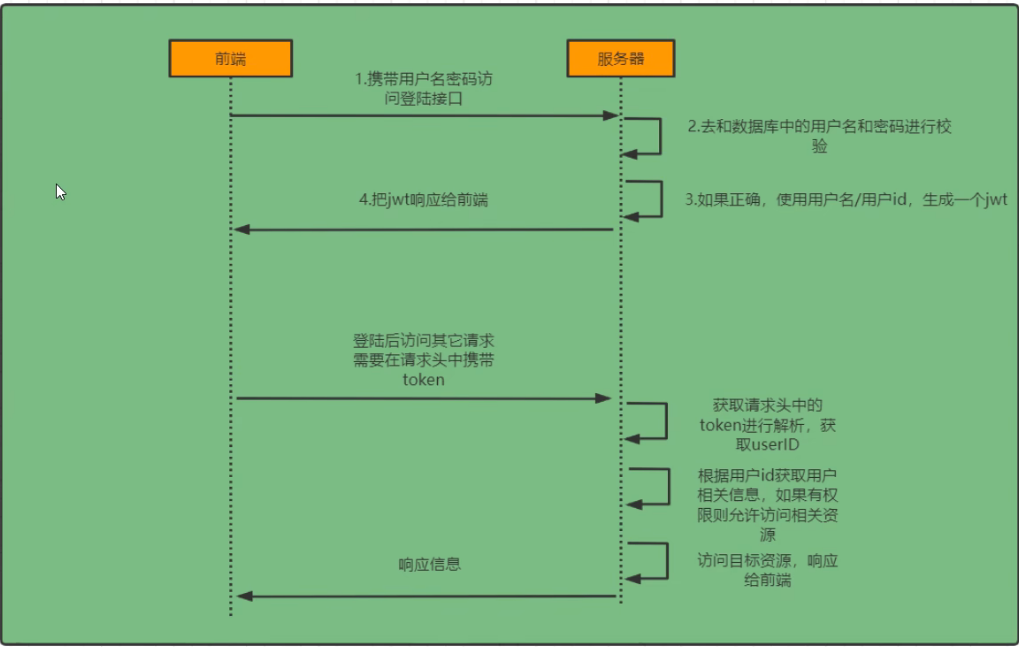
登录校验过程
原理初探
SpringSecurity的完整执行流程(图中只展示部分核心过滤器,其他非核心过滤器并没有在图中显示)

UsernamePasswordAuthenticationFilter:负责处理我们在登录页面填写了用户名和密码的登录请求
ExceptionTranslationFilter:处理过滤器链中抛出的任何AccessDeniedException和AuthenticationException
FilterSecurityInterceptor:负责权限校验的过滤器
SpringSecurity中有以下过滤器:
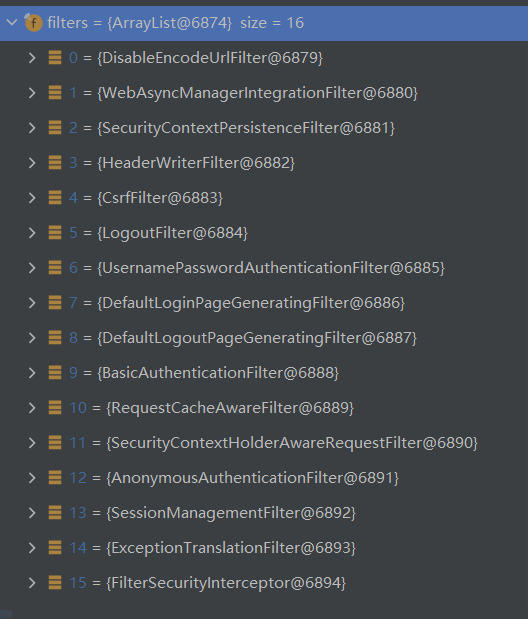
为什么我们在引入SpringSecurity后并没有进行配置,请求仍然会被发现未认证而被拦截?
在SpringBoot整合SpringSecurity时,会直接将SpringSecurity的SpringBootWebSecurityConfiguration注入到容器中
1
2
3
4
5
6
7
8
9
10
11
12
13
14
15
16
17
|
@Configuration(proxyBeanMethods = false)
@ConditionalOnWebApplication(type = Type.SERVLET)
class SpringBootWebSecurityConfiguration {
    @Configuration(proxyBeanMethods = false)
	@ConditionalOnDefaultWebSecurity
	static class SecurityFilterChainConfiguration {

		@Bean
		@Order(SecurityProperties.BASIC_AUTH_ORDER)
		SecurityFilterChain defaultSecurityFilterChain(HttpSecurity http) throws Exception {
			http.authorizeRequests().anyRequest().authenticated();
			http.formLogin();
			http.httpBasic();
			return http.build();
		}
    }
|
在SecurityFilterChainConfiguration中即是对其进行默认过滤配置
通过上面的自动配置分析,我们也能看出默认的生成条件为:
1
2
3
4
5
6
7
8
9
10
11
12
13
14
15
16
17
18
19
| class DefaultWebSecurityCondition extends AllNestedConditions {
DefaultWebSecurityCondition() {
super(ConfigurationPhase.REGISTER_BEAN);
}
@ConditionalOnClass({ SecurityFilterChain.class, HttpSecurity.class })
static class Classes {
}
@ConditionalOnMissingBean({
org.springframework.security.config.annotation.web.configuration.WebSecurityConfigurerAdapter.class,
SecurityFilterChain.class })
@SuppressWarnings("deprecation")
static class Beans {
}
}
|
- 条件一 :Classpath中存在SecurityFilterChain.class,HttpSecurity.class
- 条件二:没有自定义 WebSecurityConfigurationAdapter.class SecurityFilterChain.class
默认情况下,条件都是满足的。WebSecurityConfigurerAdapter这个类极其重要,SpringSecurity核心配置都在这个类中:
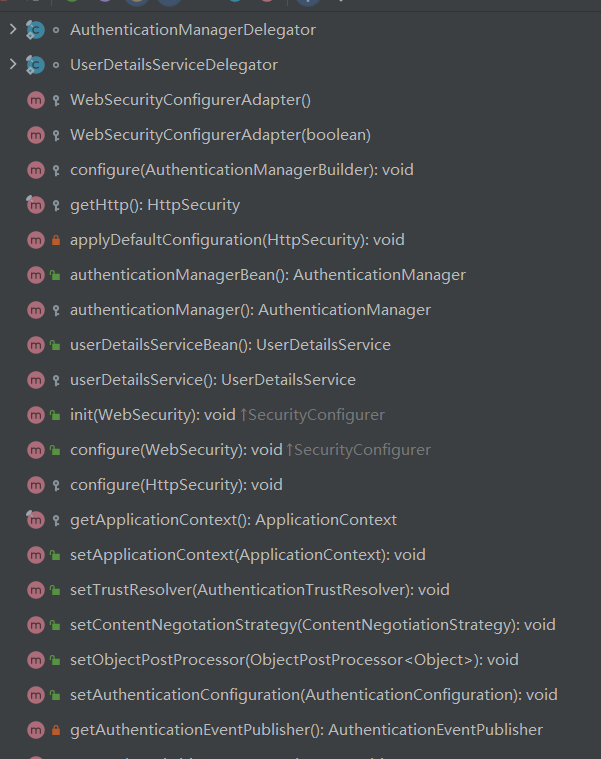
如果要对Spring Security进行自定义配置,就要自定义这个类实例,通过覆盖类中方法达到修改默认配置的目的。
请求拦截后是怎么跳转到页面的?
请求拦截流程
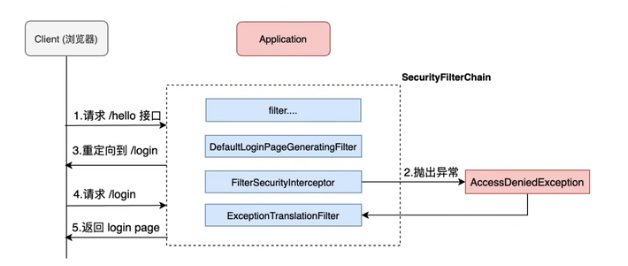
1.请求/hello接口,在引入spring security之后会先经过一些列过滤器
2.在请求到达 FilterSecurityInterceptor时,发现请求并未认证。请求拦截下来,并抛出AccessDeniedException异常。
3.抛出AccessDeniedException的异常会被ExceptionTranslationFilter捕获,这个Filter中会调用LoginUrlAuthenticationEntryPoint#commence方法给客户端返回302,要求客户端进行重定向到/login页面。
4.客户端发送/login请求。
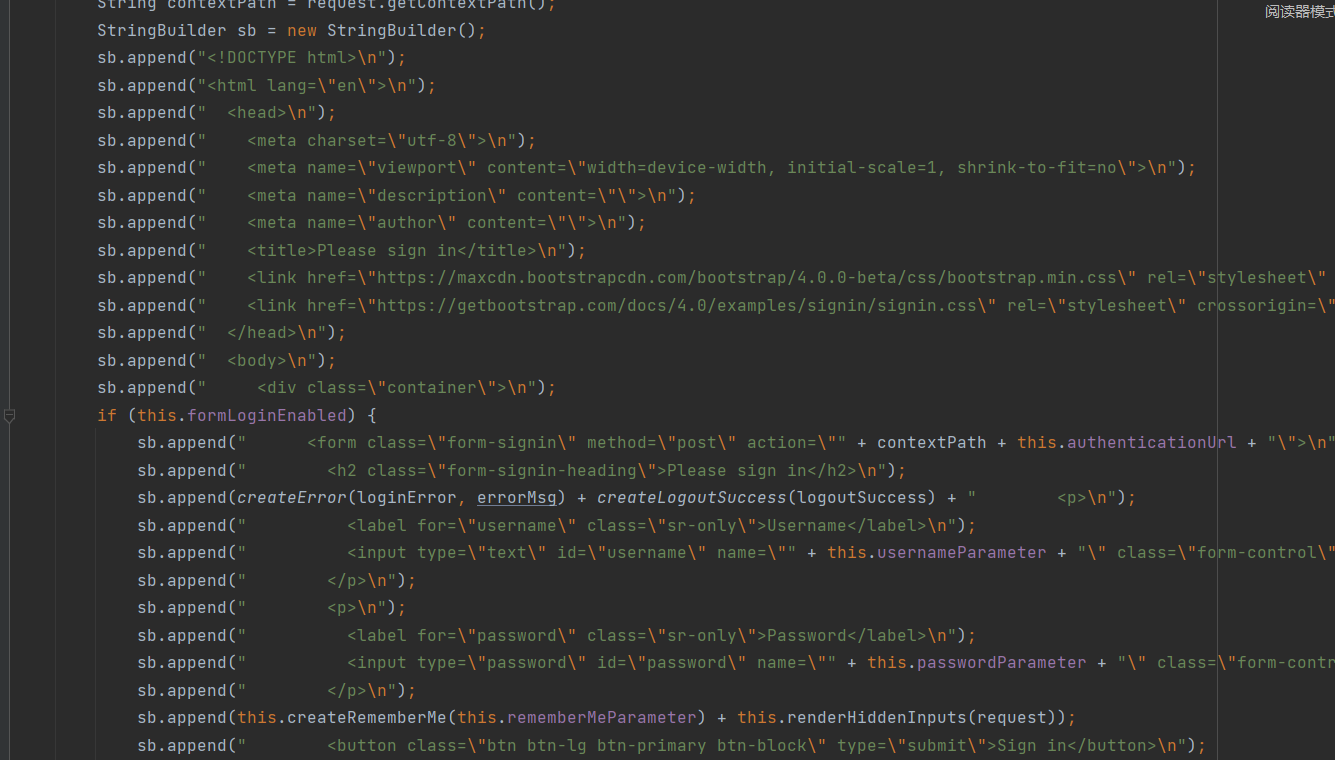
5./login请求会再次被拦截器中DefaultLoginPageGeneratingFilter拦截到,并在拦截器中返回生成登录页面。
SpringSecurity的执行流程
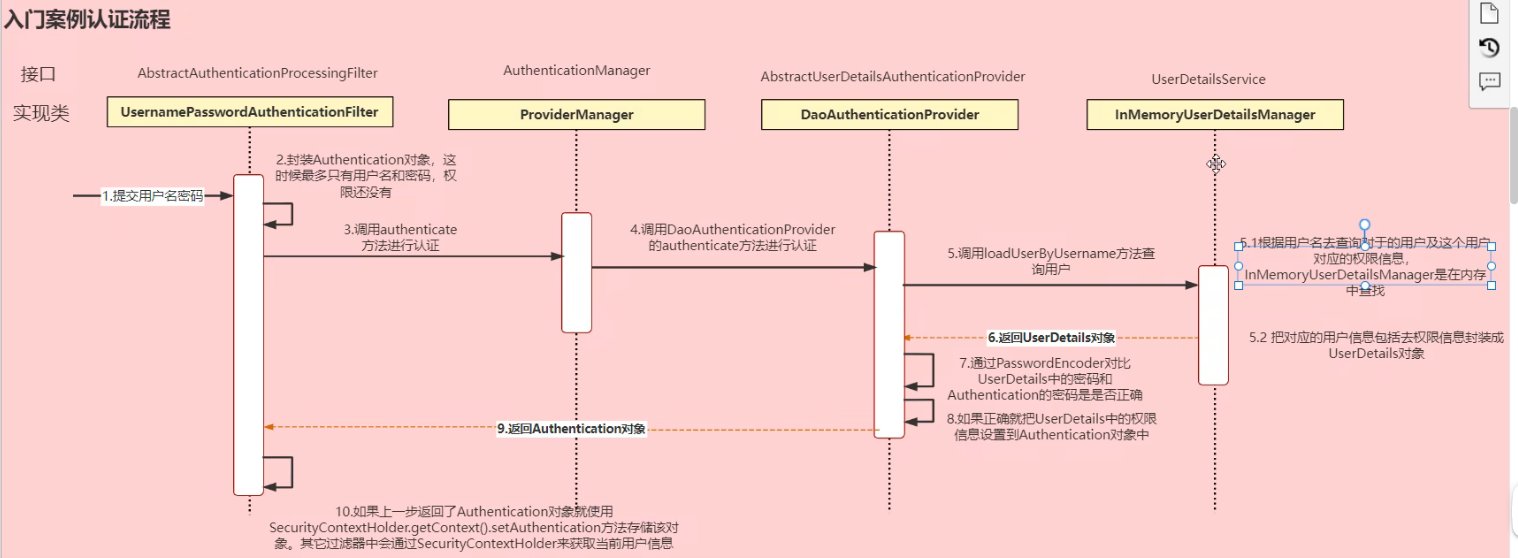
Authentication接口:它的实现类,表示当前访问系统的用户,封装了用户相关信息
AuthenticationManager: 定义了认证Authentication的方法
UserDetailsService接口:加载用户特定数据的核心接口。里面定义了一个根据用户名查询用户的信息的方法
UserDetails接口:提供核心用户信息。通过UserDetailService根据用户名获取处理用户信息要封装成UserDetails对象返回。将这些信息封装到Authentication对象中
自定义认证
自定义资源权限规则
在普通应用中一般分为首先资源和公共资源,公共资源一般是不用进行认证授权就可以直接访问的,例如我们在项目中的登录页面(/index),和一些网页中的首页(/index) ,而一些资源是受限资源需要进行认证和授权后才可以访问

首先需要我们继承WebSecurityConfigurerAdapter类并重写Configure方法
1
2
3
4
5
6
7
8
9
10
11
12
13
14
15
| protected void configure(HttpSecurity http) throws Exception {
http.formLogin()
.loginPage("/login.html")
.loginProcessingUrl("/user/login")
.defaultSuccessUrl("/test/index")
.permitAll()
.and().authorizeRequests()
.antMatchers("/test/get").permitAll()
.anyRequest().authenticated()
.and()
.csrf().disable();
}
|
登录页面 (登录页面不可将name省略且 账号密码必须是username 和 password)
1
2
3
4
5
6
7
8
9
10
11
12
13
14
15
16
17
18
| <!DOCTYPE html>
<html lang="en">
<head>
<meta charset="UTF-8">
<title>Title</title>
</head>
<body>
<form method="post" action="/user/login">
用户名 <input type="text" name="username">
<br>
密码 <input type="password" name="password">
<br>
<input type="submit" value="提交">
</form>
</body>
</html>
|
controller
1
2
3
4
5
6
7
8
9
10
11
12
13
14
15
16
17
18
19
20
21
22
23
| package com.zhang.boot.controller;
import org.springframework.web.bind.annotation.GetMapping;
import org.springframework.web.bind.annotation.RequestMapping;
import org.springframework.web.bind.annotation.RestController;
@RestController
@RequestMapping("/test")
public class TestController {
@GetMapping("/get")
public String add() {
return "hello 2023";
}
@GetMapping("/post")
public String edd() {
return "hello 2023";
}
@GetMapping("/index")
public String LoginSuccess() {
return "登录成功";
}
}
|
创建两个Controller HelloController与IndexController
1
2
3
4
5
6
| @RestController
public class HelloController {
@RequestMapping("/hello")
public String Hello(){
return "hello";
}
|
1
2
3
4
5
6
7
8
9
| @RestController
public class IndexController {
@RequestMapping("/index")
public String IndexController(){
return "hello index";
}
}
|
这时访问时,/index请求可随意访问,但其他请求仍然会被过滤然后重定向到登录页面
自定义登出页面
1
2
3
4
| http.logout()
.logoutUrl("/logout")
.logoutSuccessUrl("/login.html")
.permitAll();
|
1
2
3
4
5
6
7
8
9
10
11
12
| <!DOCTYPE html>
<html lang="en">
<head>
<meta charset="UTF-8">
<title>logout</title>
</head>
<body>
您目前正在登录
<br>
<a href="/logout">退出</a>
</body>
</html>
|
成功登录后,推出

退出后我们默认访问登陆页面

自定义权限不足的403页面
1
| http.exceptionHandling().accessDeniedPage("/error.html");
|
账号密码设置
在配置文件中进行设置
1
2
3
4
5
| spring:
security:
user:
name: root
password: root
|
在配置类中进行设置
1
2
3
4
5
6
7
8
9
10
11
12
13
14
| @Configuration
public class WebSecurityConfigurer extends WebSecurityConfigurerAdapter {
public void configure(AuthenticationManagerBuilder auth) throws Exception {
BCryptPasswordEncoder passwordEncoding = new BCryptPasswordEncoder();
String password = passwordEncoding.encode("123");
auth.inMemoryAuthentication().withUser("root").password(password).roles("admin");
}
@Bean
PasswordEncoder password(){
return new BCryptPasswordEncoder();
}
}
|
自定义编写实现类
实现接口UserDetailsService中的方法loadUserByUsername
1
2
3
4
5
6
7
8
9
10
| @Service("userDetailsService")
public class MyServiceUserDetailsService implements UserDetailsService {
@Override
public UserDetails loadUserByUsername(String username) throws UsernameNotFoundException {
List<GrantedAuthority> auths = AuthorityUtils.commaSeparatedStringToAuthorityList("role");
return new User("root",new BCryptPasswordEncoder().encode("123"),auths);
}
}
|
- 整合数据库查询数据库中的数据作为登录的账号和密码
首先要导入依赖
1
2
3
4
5
6
7
8
9
10
11
|
<dependency>
<groupId>com.baomidou</groupId>
<artifactId>mybatis-plus-boot-starter</artifactId>
<version>3.5.1</version>
</dependency>
<dependency>
<groupId>mysql</groupId>
<artifactId>mysql-connector-java</artifactId>
</dependency>
|
创建表

在配置文件中添加配置
1
2
3
4
5
6
| spring:
datasource:
username: root
password: root
url: jdbc:mysql://localhost/springsecurity?useSSL=false&serverTimezone=UTC&allowPublicKeyRetrieval=true
driver-class-name: com.mysql.cj.jdbc.Driver
|
创建实体类
1
2
3
4
5
6
7
8
9
10
| @Data
@AllArgsConstructor
@NoArgsConstructor
@TableName(value = "person")
public class person {
private Integer id;
private String username;
private String password;
}
|
创建Mapper
1
2
| @Mapper
public interface personMapper extends BaseMapper<person> {}
|
创建service (service中要实现UserDetailsService接口)
1
2
3
4
5
6
7
8
9
10
11
12
13
14
15
16
17
18
19
20
21
22
23
24
25
26
27
28
29
| @Service("userDetailsService")
public class MyServiceUserDetailsService implements UserDetailsService {
@Resource
private personMapper personMapper;
@Override
public UserDetails loadUserByUsername(String username) throws UsernameNotFoundException {
QueryWrapper<person> wrapper=new QueryWrapper<>();
wrapper.eq("username",username);
person person = personMapper.selectOne(wrapper);
if (person==null){
throw new UsernameNotFoundException("用户名不存在");
}
List<GrantedAuthority> auths = AuthorityUtils.commaSeparatedStringToAuthorityList("role");
return new User(person.getUsername(),new BCryptPasswordEncoder().encode(person.getPassword()),auths);
}
@Bean
public PasswordEncoder passwordEncoder(){
return new BCryptPasswordEncoder();
}
}
|
在自定义配置中
1
2
3
4
| @Override
public void configure(AuthenticationManagerBuilder auth) throws Exception {
auth.userDetailsService(userDetailsService).passwordEncoder(userDetailsService.getpassword());
}
|
进行测试
输入错误后
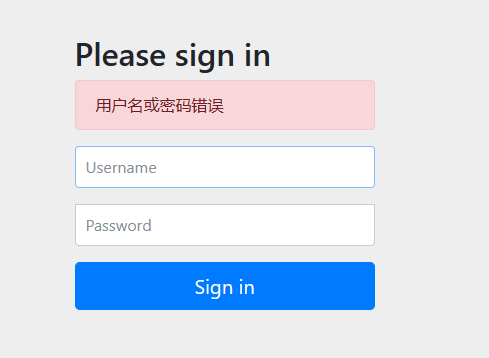
输入正确后

基于角色或权限进行访问控制
hasAuthority方法
如果当前主题具有使用权限,则返回true,否则返回false
修改配置类
1
| antMatchers("/test/index").hasAuthority("admins")
|
在MyServiceUserDetailsService中进行权限赋予
1
| List<GrantedAuthority> auths = AuthorityUtils.commaSeparatedStringToAuthorityList("admins");
|
当角色不为admins时,登陆后会发现

hasAnyAuthority方法
1
| .antMatchers("/test/index").hasAnyAuthority("admins,user")
|
hasRole方法
1
| .antMatchers("/test/index").hasRole("sale")
|
在MyServiceUserDetailsService中进行角色与权限赋予
1
| List<GrantedAuthority> auths = AuthorityUtils.commaSeparatedStringToAuthorityList("admins,ROLE_sale");
|
我们应当注意,在SpringSecurity底层,每个角色所被识别为角色的前提是要有前缀 ROLE_sale
所以当我们设置只有sale用户才能访问时,我们对应的访问角色应该为 ROLE_sale
hasAnyRole方法
用法和hasAnyAuthority类似,多个角色都可以访问
修改没有权限访问的页面
创建HTML文件 error.html
1
2
3
4
5
6
7
8
9
10
| <!DOCTYPE html>
<html lang="en">
<head>
<meta charset="UTF-8">
<title>error</title>
</head>
<body>
<h1>没有权限访问</h1>
</body>
</html>
|
将没有权限所返回的403页面改为error.html
1
| http.exceptionHandling().accessDeniedPage("/error.html");
|

注解使用
Secured
判断是否具有角色,另外需要注意的是这里匹配的字符串需要添加前缀 “ROLE_”
使用注解要先开启注解功能!
@EnableGlobalMethodSecurity(securedEnabled=true)
主启动类
1
2
3
4
5
6
7
| @EnableGlobalMethodSecurity(securedEnabled = true)
@SpringBootApplication
public class SpringAPPlictionMain {
public static void main(String[] args) {
ConfigurableApplicationContext run = SpringApplication.run(SpringAPPlictionMain.class, args);
}
}
|
需要 ROLE_normal和ROLE_admin角色才能访问
1
2
3
4
5
| @GetMapping("/post")
@Secured({"ROLE_normal","ROLE_admin"})
public String edd() {
return "hello 2023";
}
|
进行角色配置
1
| List<GrantedAuthority> auths = AuthorityUtils.commaSeparatedStringToAuthorityList("admins,ROLE_admin");
|

PreAuthorize
在方法执行之前进行权限判断
首先在主启动类开启
1
2
3
4
5
6
7
| @EnableGlobalMethodSecurity(prePostEnabled = true)
@SpringBootApplication
public class SpringAPPlictionMain {
public static void main(String[] args) {
ConfigurableApplicationContext run = SpringApplication.run(SpringAPPlictionMain.class, args);
}
}
|
在Controller层中
1
2
3
4
5
| @GetMapping("/post")
@PreAuthorize("hasAuthority('admins')")
public String edd() {
return "hello 2023";
}
|

PostAuthorize
方法执行之后再进行权限校验
和PreAuthorize一致,首先在主启动类添加配置
1
| @EnableGlobalMethodSecurity(prePostEnabled = true)
|
在Controller层中
1
2
3
4
5
6
| @GetMapping("/post")
@PostAuthorize("hasAuthority('admins')")
public String edd() {
System.out.println("---方法执行了-----");
return "hello 2023";
}
|
我们在给用户做权限设定时的权限是admin而并非admins
1
| List<GrantedAuthority> auths = AuthorityUtils.commaSeparatedStringToAuthorityList("admin,ROLE_admin");
|
我们在访问/tes/post 并输入了账号密码后

但我们已经执行了该方法,但没有返回值

ProFilter
可以在返回结果的集合中过滤出符合我们表达式的结果,可以在其中判断是否为某角色或者是否拥有某权限
1
2
3
4
5
6
7
8
9
| @GetMapping("/post")
@PostFilter(" hasAuthority('admins') or filterObject.id==1")
public List<person> edd() {
List<person> personList=new ArrayList<>();
personList.add(new person(1,"111","111"));
personList.add(new person(2,"222","222"));
System.out.println(personList);
return personList;
}
|
该判断为 是否 有权限admins或在其返回的结果的集合的其中是否有对象的参数id为1
将其认证为admins
1
| List<GrantedAuthority> auths = AuthorityUtils.commaSeparatedStringToAuthorityList("admins,ROLE_admin");
|
输出结果为true,所以输出结果为

当@PostFilter中参数为@PostFilter(“filterObject.id==1”)时输出结果为

preFilter
方法参数集合中的参数,只留下符合条件的参数将其传入方法中
实现自动登录
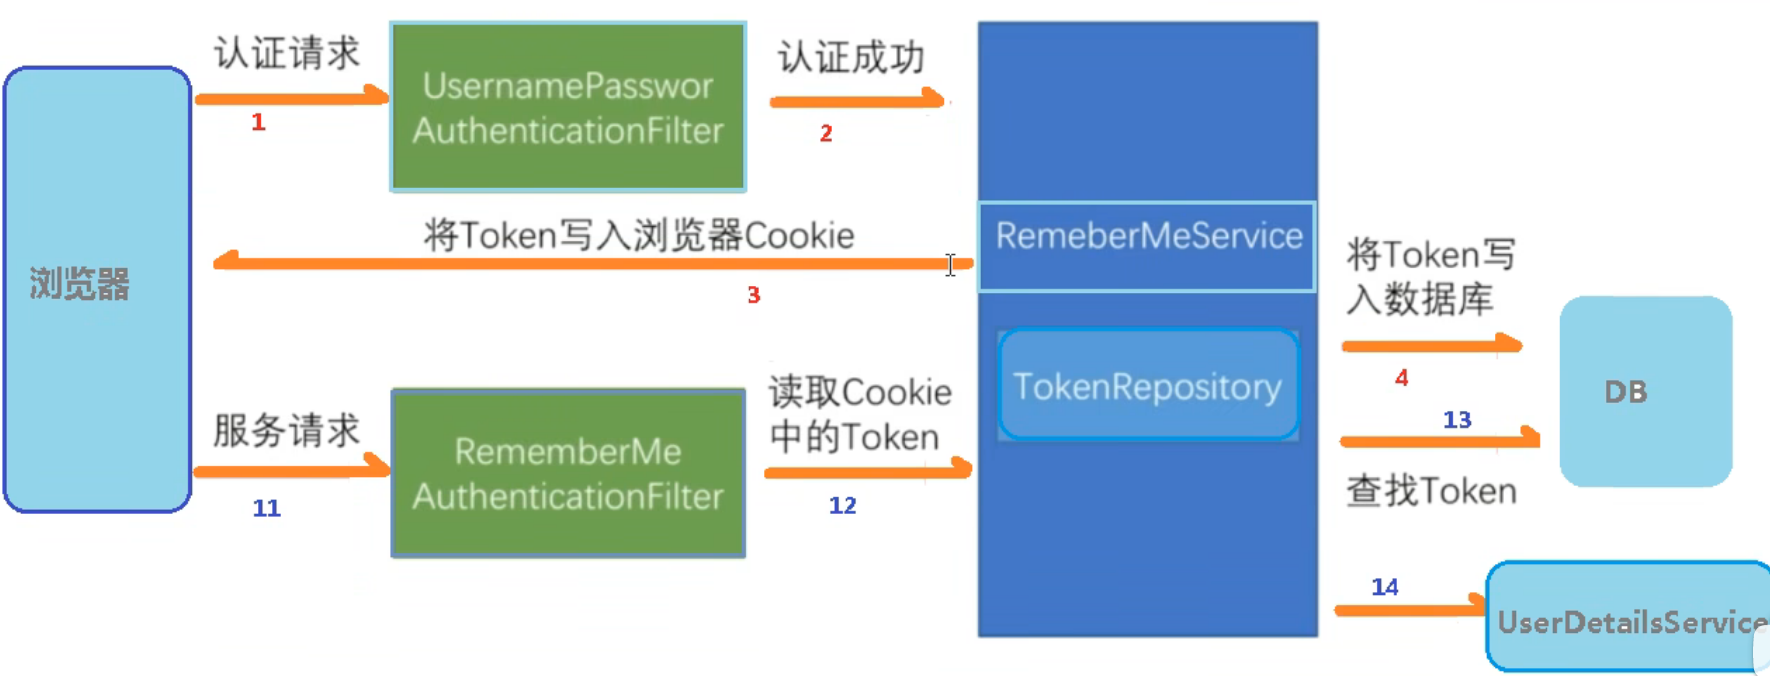
实现自动登录的实现原理

自动登录在SpringSecurity中的实现过程
首先要先建表,将用户名和token自动存入数据库中方便读取
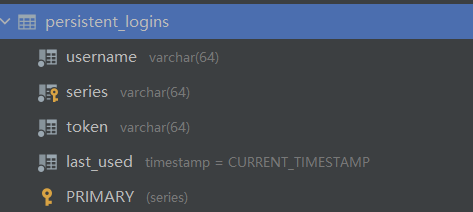
然后在配置类中添加配置
1
2
3
4
5
6
7
8
9
10
11
12
13
14
15
16
17
18
19
20
21
22
23
| @Resource
private DataSource dataSource;
.and().rememberMe()
.tokenRepository(persistentTokenRepository())
.tokenValiditySeconds(60)
将数据源注入到PersistentTokenRepository中
@Bean
public PersistentTokenRepository persistentTokenRepository(){
JdbcTokenRepositoryImpl jdbcTokenRepository= new JdbcTokenRepositoryImpl();
jdbcTokenRepository.setDataSource(dataSource);
return jdbcTokenRepository;
}
|
修改登录页添加是否自动登录的选项
1
2
3
4
5
6
7
8
9
10
11
12
13
14
15
16
17
18
19
20
| <!DOCTYPE html>
<html lang="en">
<head>
<meta charset="UTF-8">
<title>Title</title>
</head>
<body>
<form method="post" action="/user/login">
<!-- 其中,username password remember-me 需要写死 -->
用户名 <input type="text" name="username">
<br>
密码 <input type="password" name="password">
<br>
<input type="checkbox" name="remember-me">自动登录
<br>
<input type="submit" value="提交">
</form>
</body>
</html>
|
开始测试(选中自动登录后)


CSRF
概念
跨站请求伪造(英语:Cross-site request forgery),也被称为one-click attack或者session riding,通常缩写为CSRF或者XSRF,是一种挟制用户在当前已登录的Web应用程序上执行非本意的操作的攻击方法。跟跨网站脚本(XSS)相比,XSS利用的是用户对指定网站的信任,CSRF 利用的是网站对用户网页浏览器的信任。
跨站请求攻击,简单地说,是攻击者通过一些技术手段欺骗用户的浏览器去访问一个自己曾经认证过的网站并运行一些操作(如发邮件,发消息,甚至财产操作如转账和购买商品)。由于浏览器曾经认证过,所以被访问的网站会认为是真正的用户操作而去运行。这利用了web中用户身份验证的一个漏洞:简单的身份验证只能保证请求发自某个用户的浏览器,却不能保证请求本身是用户自愿发出的。
SpringSecurity微服务权限方案
什么是微服务
微服务的由来
微服务最早由Martin Fowler与James Lewis于2014年共同提出,微服务架构风格是一种使用一套小服务来开发单个应用的方式途径,每个服务运行在自己的进程中,并使用轻量级机制通信,通常是HTTP API,这些服务基于业务能力构建,并能够通过自动化部署机制来独立部署,这些服务使用不同的编程语言实现,以及不同数据存储技术,并保持最低限度的集中式管理。,
微服务的优势
(1)微服务每个模块就相当于一个单独的项目,代码量明显减少,遇到问题也相对来说比交好解决。!
(2)微服务每个模块都可以使用不同的存储方式(比如有的用xedis,有的用mxsa.等),数据库也是单个模块对应自己的数据库。,
(3)微服务每个模块都可以使用不同的开发技术,开发模式更灵活。
微服务本质
(1)微服务,关键其实不仅仅是微服务本身,而是系统要提供一套基础的架构,这种架构使得微服务可以独立的部署、运行、升级,不仅如此,这个系统架构还让微服务与微服务之间在结构上“松耦合”,而在功能上则表现为一个统一的整体。这种所谓的“统一的整体”表现出来的是统一风格的界面,统一的权限管理,统一的安全策略,统一的上线过程,统一的日志和审计方法,统一的调度方式,统一的访问入口等等。+
(2)微服务的目的是有效的拆分应用,实现敏捷开发和部署。
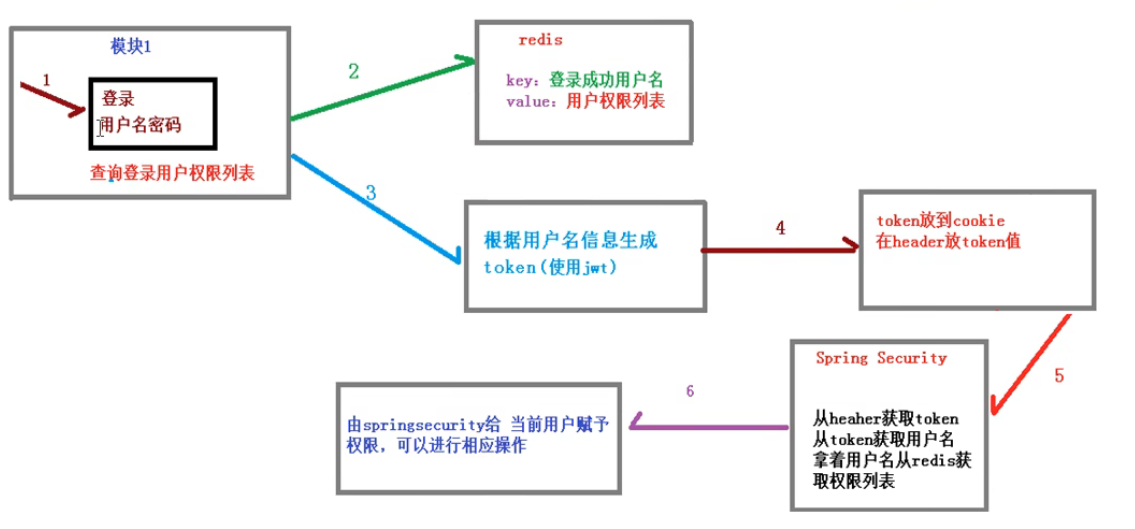
如何在微服务中实现登录的认证和授权
