SpringloudAlibaba
Nacos
Nacos(Naming Configuration 的前两个字母,最后的s为Service),注册中心+配置中心(euruka+config+bus)
Nacos中文官方home (nacos.io)
下载安装
下载地址Release 1.1.4(Oct 24th, 2019) · alibaba/nacos (github.com)
安装:
本地需要java8和maven环境
直接启动/bin/startup.cmd(在项目运行时,如果要保证Nacos正常使用,那么这个窗口不可以关闭)
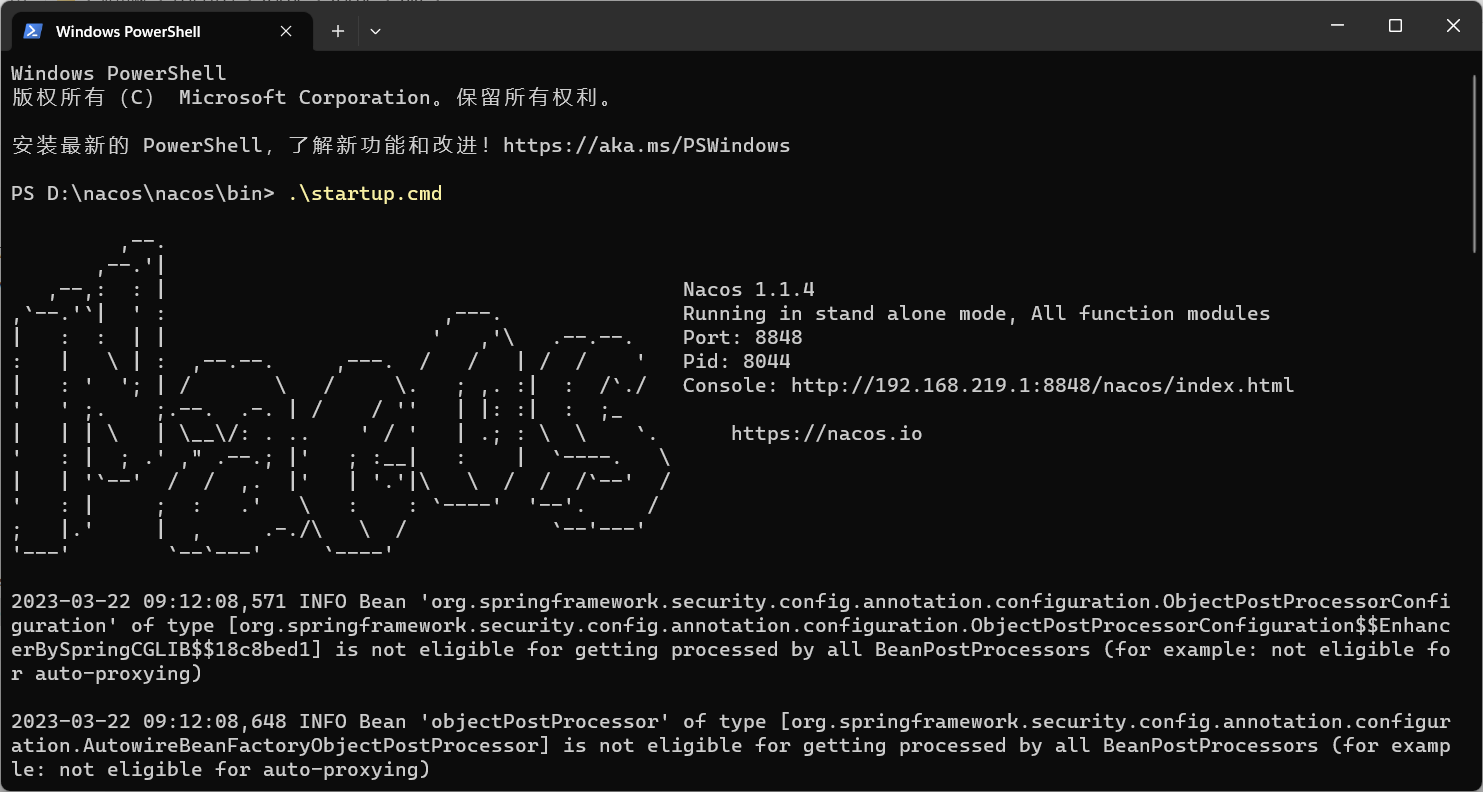
在浏览器中输入http://localhost:8848/nacos
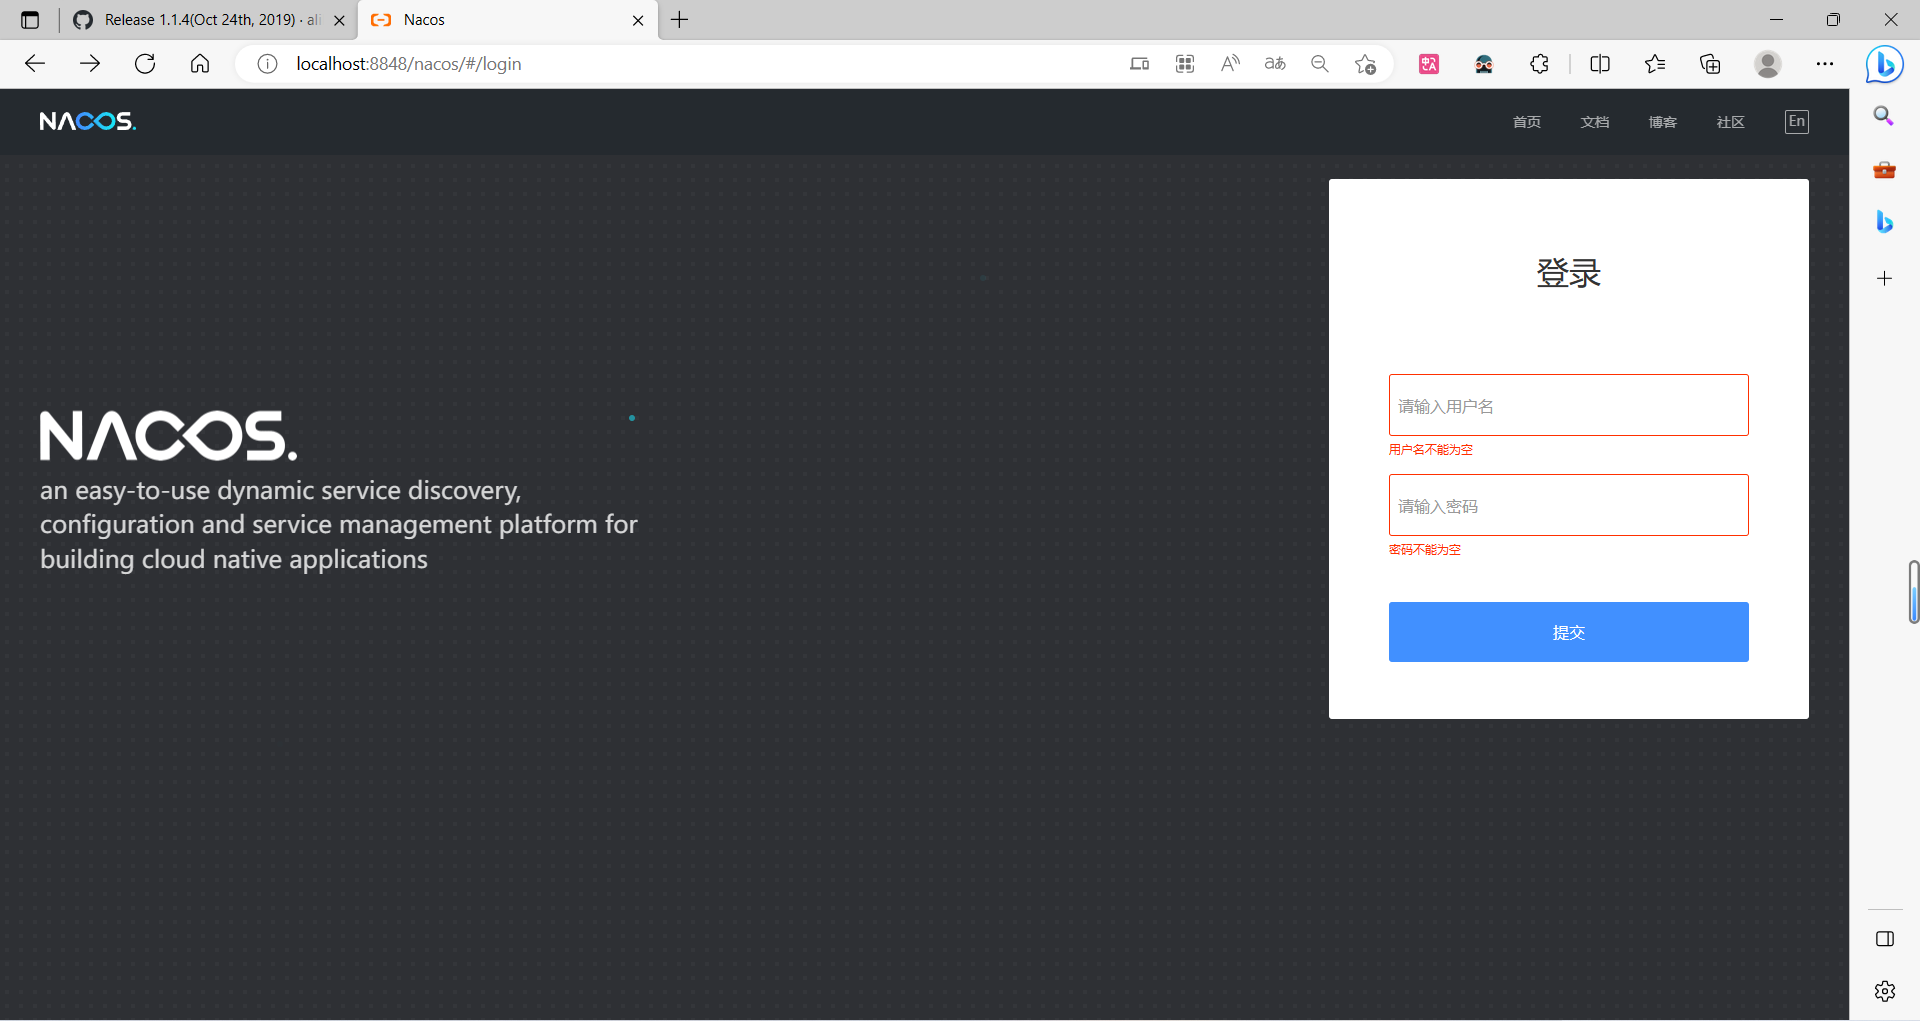
默认的账号和密码都为nacos
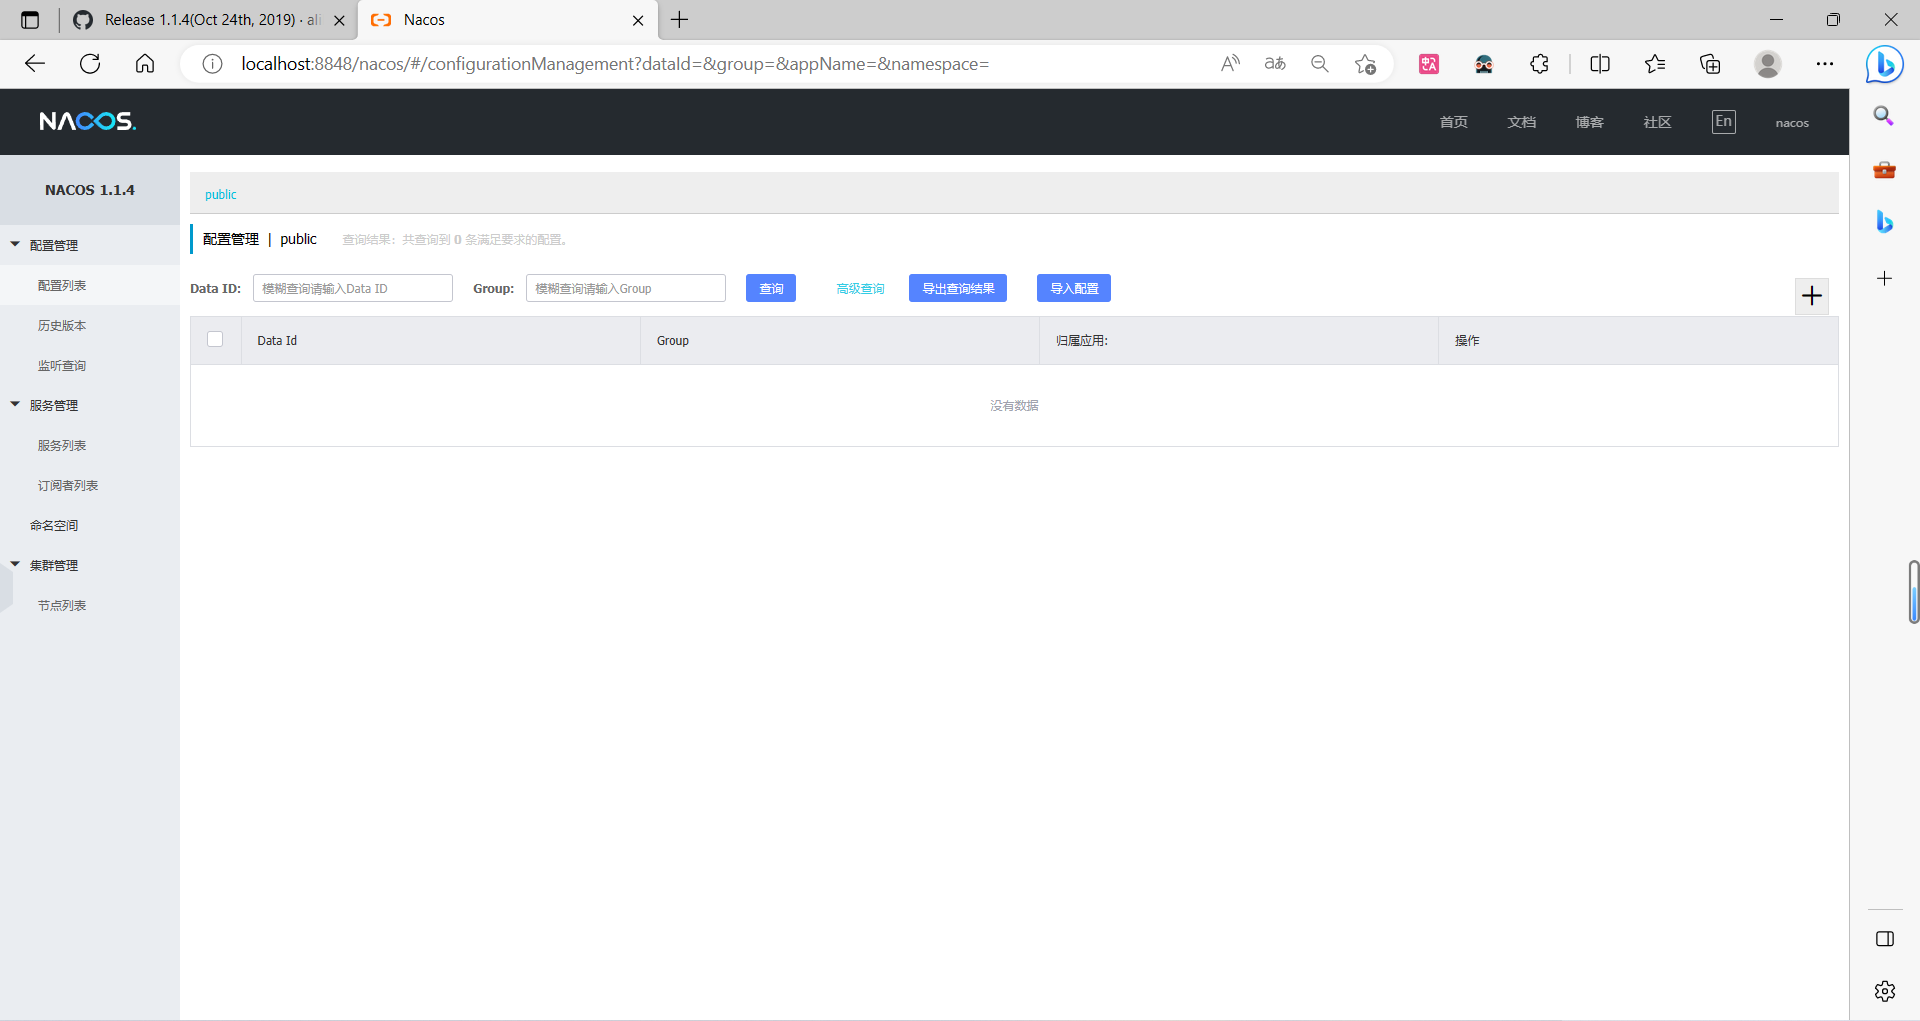
Nacos服务注册发现中心
官方文档:Spring Cloud Alibaba Reference Documentation (spring-cloud-alibaba-group.github.io)
首先要在父项目导入SpringCLoudAlibaba依赖
1
2
3
4
5
6
7
8
| <dependency>
<groupId>com.alibaba.cloud</groupId>
<artifactId>spring-cloud-alibaba-dependencies</artifactId>
<version>2.1.0.RELEASE</version>
<type>pom</type>
<scope>import</scope>
</dependency>
<dependency>
|
子项目中可直接导入Nacos依赖
1
2
3
4
5
6
7
8
9
10
11
12
13
14
15
16
17
18
19
20
21
22
23
24
25
26
|
<dependency>
<groupId>com.alibaba.cloud</groupId>
<artifactId>spring-cloud-starter-alibaba-nacos-discovery</artifactId>
</dependency>
<dependency>
<groupId>org.springframework.boot</groupId>
<artifactId>spring-boot-devtools</artifactId>
<scope>runtime</scope>
<optional>true</optional>
</dependency>
<dependency>
<groupId>org.springframework.boot</groupId>
<artifactId>spring-boot-starter-web</artifactId>
</dependency>
<dependency>
<groupId>org.projectlombok</groupId>
<artifactId>lombok</artifactId>
<optional>true</optional>
</dependency>
<dependency>
<groupId>org.springframework.boot</groupId>
<artifactId>spring-boot-starter-actuator</artifactId>
</dependency>
|
构建服务生产者
主启动类的构建
1
2
3
4
5
6
7
8
9
10
11
| import org.springframework.boot.SpringApplication;
import org.springframework.boot.autoconfigure.SpringBootApplication;
import org.springframework.cloud.client.discovery.EnableDiscoveryClient;
@SpringBootApplication
@EnableDiscoveryClient
public class NacosMain9001 {
public static void main(String[] args) {
SpringApplication.run(NacosMain9001.class,args);
}
}
|
配置文件
1
2
3
4
5
6
7
8
9
10
11
12
13
14
15
16
17
18
19
| server:
port: 9001
spring:
application:
name: nacos-payment-provider
cloud:
nacos:
discovery:
server-addr: localhost:8848
management:
endpoints:
web:
exposure:
include: '*'
|
业务层
1
2
3
4
5
6
7
8
9
10
11
12
13
14
15
16
17
| import lombok.extern.slf4j.Slf4j;
import org.springframework.beans.factory.annotation.Value;
import org.springframework.web.bind.annotation.GetMapping;
import org.springframework.web.bind.annotation.PathVariable;
import org.springframework.web.bind.annotation.RestController;
@RestController
@Slf4j
public class testController {
@Value("${server.port}")
private String serverPort;
@GetMapping("/payment/nacos/{id}")
public String test(@PathVariable String id){
return "hello,nacos!!"+id+",port:"+serverPort;
}
}
|
当我们启动服务时我们会发现

我们再对其做一个服务注册发现的集群NacosMain9002,然后启动9002发现

(PS:是真的简单啊!!!!!!比Eureka不知道方便多少倍了!!!!)
构建服务消费者
依赖坐标导入和生产者一样
配置文件
1
2
3
4
5
6
7
8
9
10
11
12
13
| server:
port: 83
spring:
application:
name: nacos-order-consumer
cloud:
nacos:
discovery:
server-addr: localhost:8848
service-url:
nacos-user-service: http://nacos-payment-provider
|
Nacos整合了ribbon实现了服务调用的负载均衡,所以整合了RestTemlate,我们需要注入RestTemplate并添加负载均衡的注解@LoadBalanced

1
2
3
4
5
6
7
8
| @Configuration
public class ApplicationcontextConfig {
@Bean
@LoadBalanced
public RestTemplate getRestTemplate(){
return new RestTemplate();
}
}
|
业务层
1
2
3
4
5
6
7
8
9
10
11
12
13
14
15
16
17
18
19
20
21
22
| import lombok.extern.slf4j.Slf4j;
import org.springframework.beans.factory.annotation.Value;
import org.springframework.web.bind.annotation.GetMapping;
import org.springframework.web.bind.annotation.PathVariable;
import org.springframework.web.bind.annotation.RestController;
import org.springframework.web.client.RestTemplate;
import javax.annotation.Resource;
@RestController
@Slf4j
public class OrderNacosController {
@Resource
private RestTemplate restTemplate;
@Value("${service-url.nacos-user-service}")
private String serverURL;
@GetMapping(value = "/consumer/payment/nacos/{id}")
public String paymentInfo(@PathVariable String id){
return restTemplate.getForObject(serverURL+"/payment/nacos/"+id,String.class);
}
}
|
实现负载均衡,且调用规则为轮训调用

Nacos作为服务注册中心对比
对于CAP模型的支持,Nacos不仅支持AP而且还支持CP,AP为默认支持,CP需要手动调整
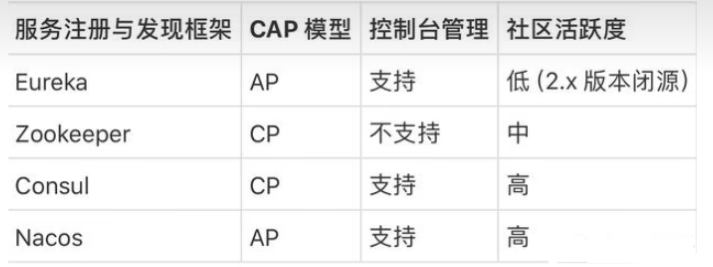
nacos既可以像Eureka与Zookeeper那样临时创建实例,也可以像consul和coreDNS那样持久化创建实例
何时选择使用何种模式?
- 一般来说,如果不需要存储服务级别的信息且服务实例是通过nacos-client主册,并能够保持心跳上报,那么就可以选择AP模式。当前主流的服务如Spring cloud和Dubo服务,都适用于AP模式,AP模式为了服务的可能性而减弱了一致性,因此AP模式下只支持注册临时实例。
- 如果需要在服务级别编辑或者存储配置信息,那么CP是必须,K8S服务和DNS服务则适用于CP模式。CP模式下则支持注册持久化实例,此时则是以Raft协议为集群运行模式,该模式下注册实例之前必须先注册服务,如果服务不存在,则会返回错误。
切换服务模式
1
| curl -x PUT '$NACOS_SERVER:8848/nacos/v1/ns/operator/switches?entry=serverMode&value=cp'
|
Nacos作为配置中心
首先创建模块cloudalibaba-config-nacos-clinet3377
导入依赖坐标
1
2
3
4
5
6
7
8
9
10
11
12
13
14
15
16
17
18
19
20
21
22
23
24
25
26
27
28
29
30
31
32
33
34
35
36
|
<dependency>
<groupId>com.alibaba.cloud</groupId>
<artifactId>spring-cloud-starter-alibaba-nacos-discovery</artifactId>
</dependency>
<dependency>
<groupId>com.alibaba.cloud</groupId>
<artifactId>spring-cloud-starter-alibaba-nacos-config</artifactId>
</dependency>
<dependency>
<groupId>org.springframework.boot</groupId>
<artifactId>spring-boot-devtools</artifactId>
<scope>runtime</scope>
<optional>true</optional>
</dependency>
<dependency>
<groupId>org.springframework.boot</groupId>
<artifactId>spring-boot-starter-web</artifactId>
</dependency>
<dependency>
<groupId>org.projectlombok</groupId>
<artifactId>lombok</artifactId>
<optional>true</optional>
</dependency>
<dependency>
<groupId>org.springframework.boot</groupId>
<artifactId>spring-boot-starter-actuator</artifactId>
</dependency>
|
创建两个配置文件 bootstrap.yaml,application.yaml
bootstrap.yaml
1
2
3
4
5
6
7
8
9
10
11
12
13
| server:
port: 3377
spring:
application:
name: nacos-config-clinet
cloud:
nacos:
discovery:
server-addr: localhost:8848
config:
server-addr: localhost:8848
file-extension: yaml
|
application.yaml
1
2
3
| spring:
profiles:
active: dev
|
主启动类
1
2
3
4
5
6
7
8
9
10
11
12
| import org.springframework.boot.SpringApplication;
import org.springframework.boot.autoconfigure.SpringBootApplication;
import org.springframework.cloud.client.discovery.EnableDiscoveryClient;
@SpringBootApplication
@EnableDiscoveryClient
public class ConfigMain3377 {
public static void main(String[] args) {
SpringApplication.run(ConfigMain3377.class,args);
}
}
|
业务类
1
2
3
4
5
6
7
8
9
10
11
12
13
14
15
16
17
18
| import lombok.extern.slf4j.Slf4j;
import org.springframework.beans.factory.annotation.Value;
import org.springframework.cloud.context.config.annotation.RefreshScope;
import org.springframework.web.bind.annotation.GetMapping;
import org.springframework.web.bind.annotation.RestController;
@RestController
@Slf4j
@RefreshScope
public class ConfigController {
@Value("${config.info}")
private String configInfo;
@GetMapping("/config/info")
public String configtest(){
return configInfo;
}
}
|
添加配置需要我们再nacos管理页面进行配置
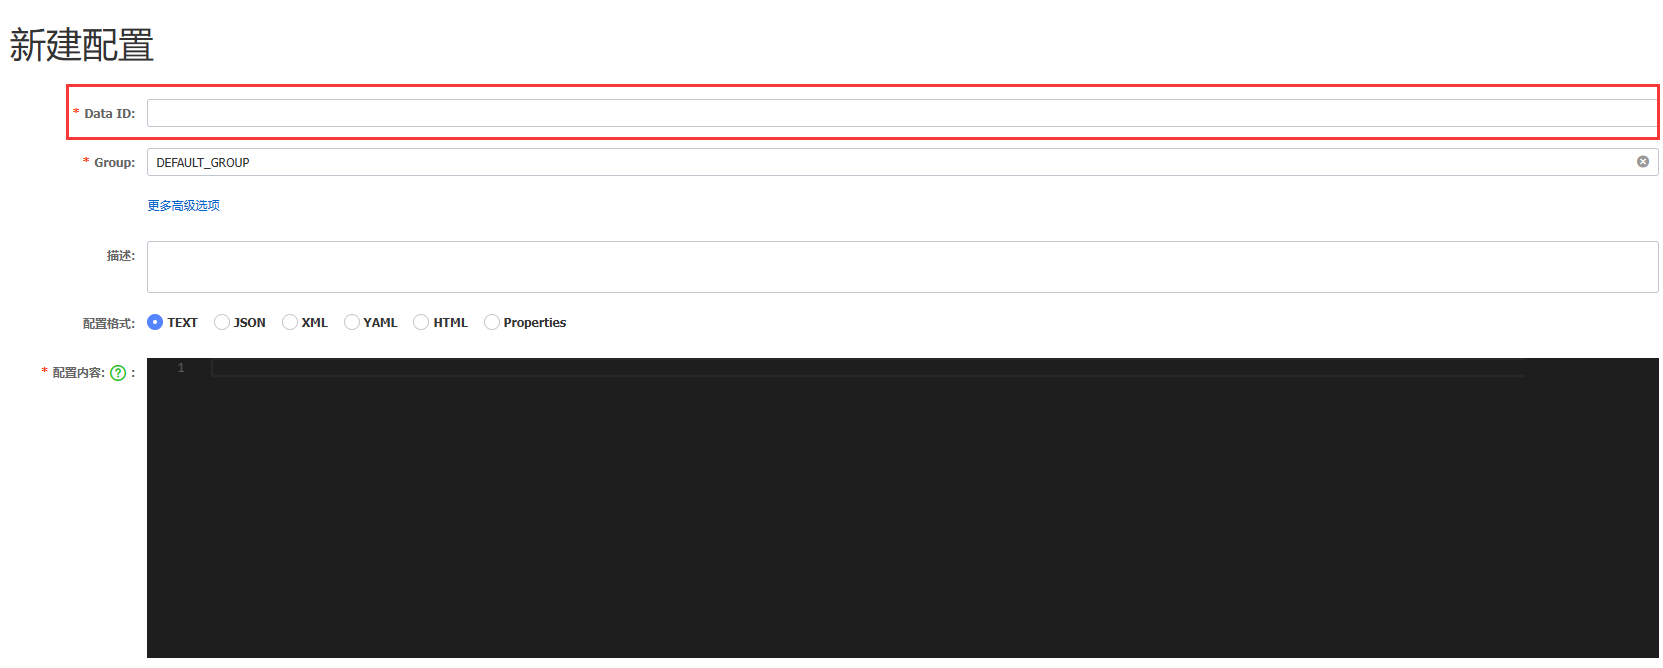
在 dataID的配置中有许多约束
DataID= ${Spring.application.name}-${spring.profiles.active}.${spring.cloud.nacos.config.file-extension}


在配置内容中

启动配置中心主启动类,并访问

由于我们的ConfigController类中加入了注解@RefreshScope,所以在ConfigController类中所注入的配置就会进行动态刷新,当我们修改配置时,我们可以看到


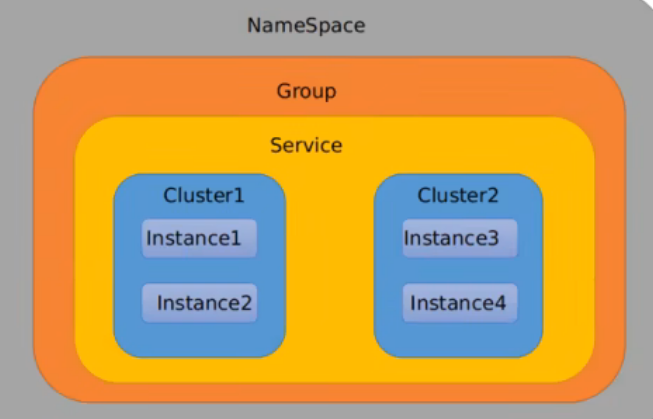
NameSpace、group、Service的区别
默认情况
Namespace=public,Group=DEFAULT_GROUP,Cluster是DEFAULT
Nacos默认的命名空间是public,Namespace主要用来实现隔离。
比方说我们现在有三个环境:开发、测试、生产环境,我们就可以创建三个Namespace,不同的Namespace之间是隔离的。
Group默认是DEFAULT_GROUP,Group可以把不同的微服务划分到同一分组里面去。配置分组的常见场景:不同的应用或组件使用了相同的配置类型,如 database_url 配置和 MQ_topic 配置。说人话,就是可以分组,不同的系统或微服务的配置文件可以放在一个组里。比如用户系统和订单系统的配置文件都可以放在同个组中。
Service就是微服务;一个Service可以包含多个Cluster,Nacos默认Cluster是DEFAULT,是Cluster是对指定微服务的一个虚拟划分。其中的dataid说人话就是配置文件的名字,相当于主键的作用
DataID
当我们修改配置文件中的开发环境将
1
2
3
4
5
| spring:
profiles:
改为
active: test
|
这时我们再创建一个DataID为:nacos-config-clinet-test.yaml的配置文件
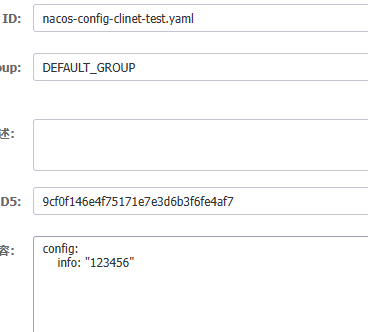
重启主启动类并请求后

group
当我们的dataID相同配置Group不同时
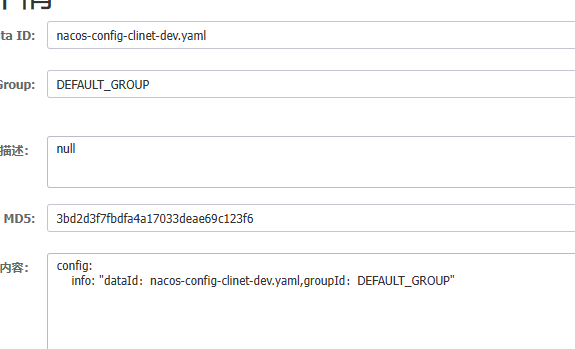
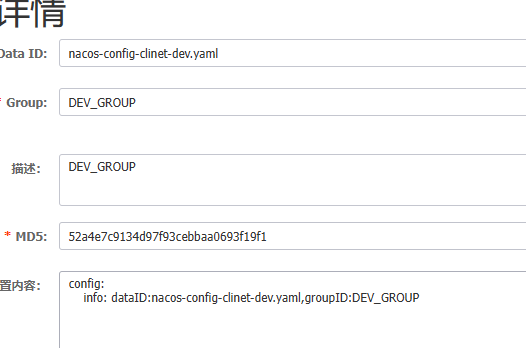
默认的group为:DEFAULT_GROUP,当我们的Group为:DEV_GROUP时该怎么调用其中的配置呢?
在配置文件中添加配置bootsrtap.yaml
1
2
3
4
5
6
7
8
9
10
11
| spring:
application:
name: nacos-config-clinet
cloud:
nacos:
discovery:
server-addr: localhost:8848
config:
server-addr: localhost:8848
file-extension: yaml
group: DEV_GROUP
|
重启服务再次在浏览器中请求
NameSpace:
但当前的环境为公共环境,当我们想切换到测试环境时该怎么办呢?这时候需要我们去添加命名空间namespace,namespace的默认值为public
我们去添加一个nameSpace:test

我们向test工作环境中添加配置

怎么去test中调用该配置呢?
实际上我们的配置文件是这样的
1
2
3
4
5
6
7
8
9
10
11
12
| spring:
application:
name: nacos-config-clinet
cloud:
nacos:
discovery:
server-addr: localhost:8848
config:
server-addr: localhost:8848
file-extension: yaml
group: DEAULT_GROUP
namespace: public
|
他们的对应关系如下图(相同颜色的为同一对应关系)
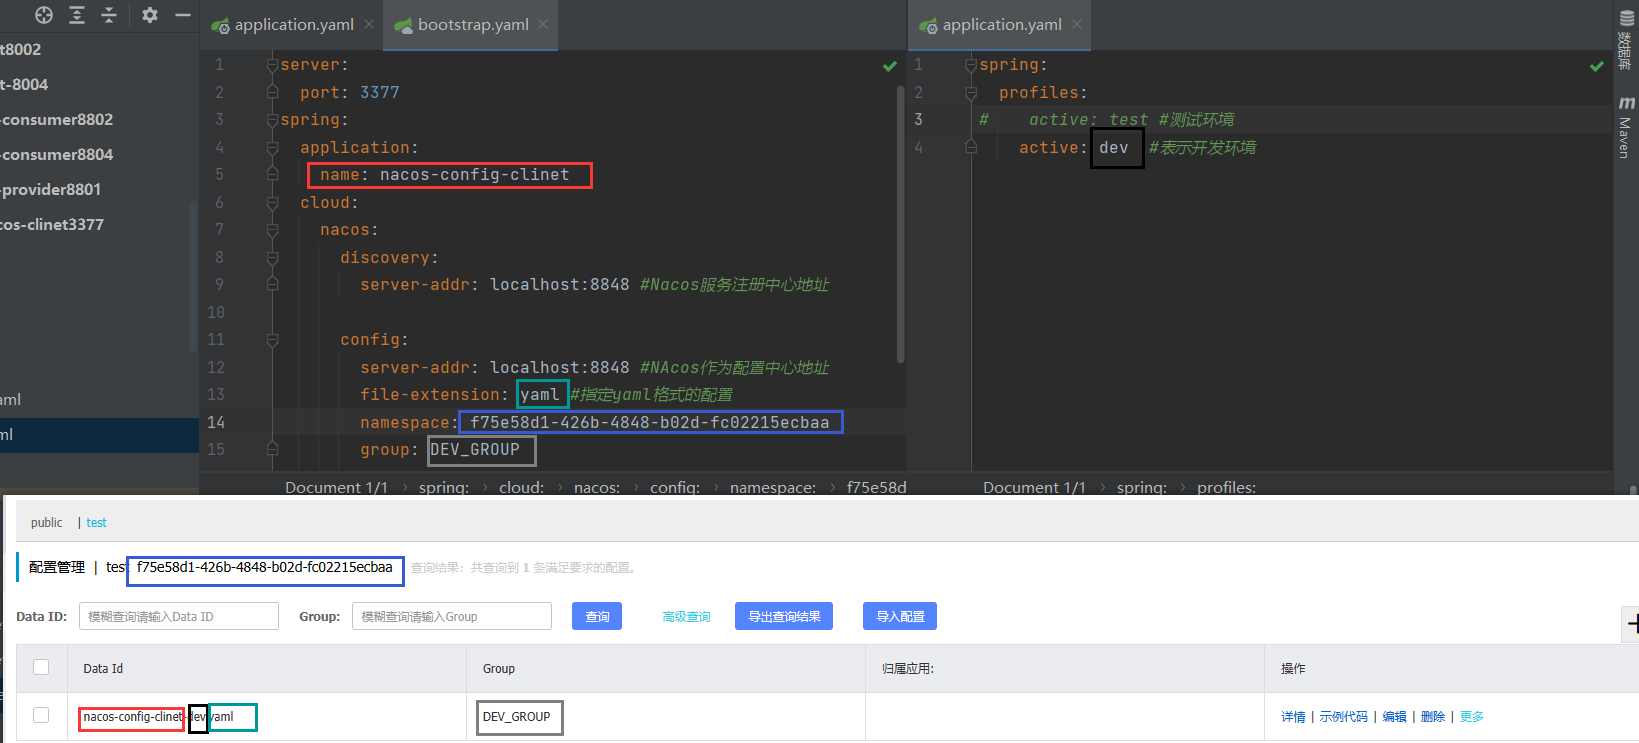
当我们访问时

Bbyati:nv5<q
若要动态的获取配置,则需要
1
2
3
4
5
6
7
| @Resource
ConfigurableApplicationContext context;
public String getConfig(){
return context.getEnvironment().getProperty("common.config");
}
|
Spring Cloud Alibaba Nacos Config可支持自定义 Data Id 的配置。 一个完整的配置案例如下所示
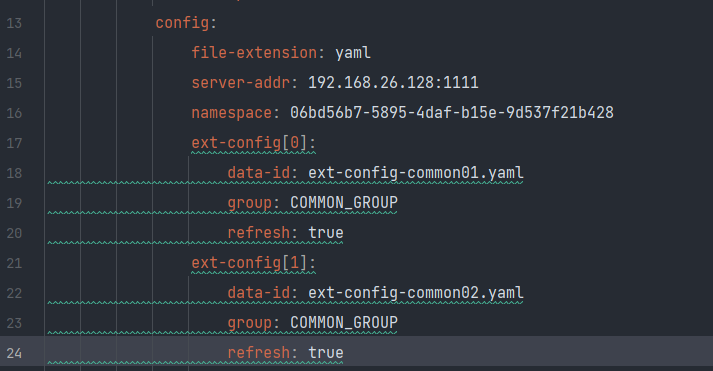
- 通过 spring.cloud.nacos.config.ext-config[n].data-id 的配置方式来支持多个 Data Id 的配置
- 通过 spring.cloud.nacos.config.ext-config[n].group 的配置方式自定义 Data Id 所在的组,不明确配置 的话,默认是 DEFAULT_GROUP。
- 通过 spring.cloud.nacos.config.ext-config[n].refresh 的配置方式来控制该 Data Id 在配置变更时,是 否支持应用中可动态刷新, 感知到最新的配置值。默认是不支持的
- [n]中的值代表着配置优先级,n越大优先级越高
Linux安装Nacos配置集群
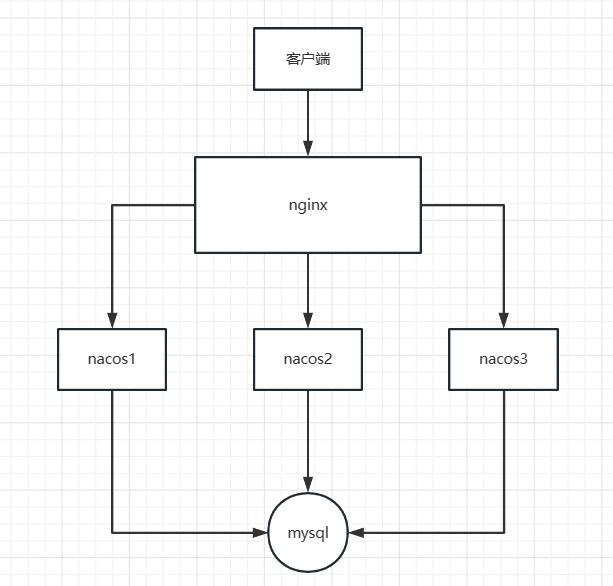
环境:
Linux CentOS7
mysql 5.7.15
nginx 1.2.5
nacos 1.1.4
首先我们找到 nacos安装包下的conf包中可以看到nacos-config.sql ,将其中的sql代码加入mysql中执行后,向applicaiton.properties其中添加配置
1
2
3
4
5
6
| spring.datasource.platform=mysql
db.num=1
db.url.0=jdbc:mysql://127.0.0.1:3306/nacos_config?characterEncoding=utf8&connectTimeout=1000&socketTimeout=3000&autoReconnect=true&useUnicode=true&useSSL=false&serverTimezone=UTC
db.user.0=root
db.password.0=密码
|
然后将cluster.conf.example 改名为cluster.conf,修改其中配置
1
2
3
| 虚拟机IP:集群端口1
虚拟机IP:集群端口2
虚拟机IP:集群端口3
|
修改 /nacos/bin/start.sh ,加入配置
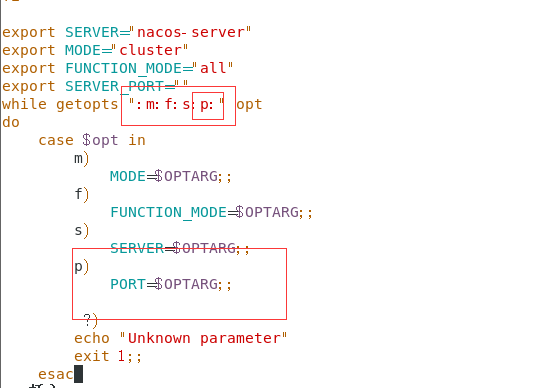

然后修改nginx配置
在 /nginx/conf/nginx.conf的 http{}修改
1
2
3
4
5
6
7
8
9
10
11
12
13
14
15
16
| upstream cluster{
server 127.0.0.1:集群端口1;
server 127.0.0.1:集群端口2;
server 127.0.0.1:集群端口3;
}
server {
listen 1111;
server_name 本机ip;
location / {
proxy_pass http://cluster;
}
|
注意放行防火墙的集群端口
重启nginx
然后 开启nacos服务
1
2
3
| ./startup.sh -p 集群端口1
./startup.sh -p 集群端口2
./startup.sh -p 集群端口3
|
启动服务成功后,地址栏输入 虚拟机ip:1111/nacos即可看到页面
Sentinel
什么是sentinel
随着微服务的流行,服务和服务之间的稳定性变得越来越重要。Sentinel 以流量为切入点,从流量控制、流量路由、熔断降级、系统自适应过载保护、热点流量防护等多个维度保护服务的稳定性。
Sentinel 具有以下特征:
- 丰富的应用场景:Sentinel 承接了阿里巴巴近 10 年的双十一大促流量的核心场景,例如秒杀(即突发流量控制在系统容量可以承受的范围)、消息削峰填谷、集群流量控制、实时熔断下游不可用应用等。
- 完备的实时监控:Sentinel 同时提供实时的监控功能。您可以在控制台中看到接入应用的单台机器秒级数据,甚至 500 台以下规模的集群的汇总运行情况。
- 广泛的开源生态:Sentinel 提供开箱即用的与其它开源框架/库的整合模块,例如与 Spring Cloud、Apache Dubbo、gRPC、Quarkus 的整合。您只需要引入相应的依赖并进行简单的配置即可快速地接入 Sentinel。同时 Sentinel 提供 Java/Go/C++ 等多语言的原生实现。
- 完善的 SPI 扩展机制:Sentinel 提供简单易用、完善的 SPI 扩展接口。您可以通过实现扩展接口来快速地定制逻辑。例如定制规则管理、适配动态数据源等。
Sentinel控制台
我们可以在maven上下载到Sentinel的jar包Maven Repository: com.alibaba.csp » sentinel-core (mvnrepository.com)
可以在github下载Sentinel-dashboardjar包Releases · alibaba/Sentinel (github.com)
运行前提:
java版本8及以上
且8080端口不能被占用
运行Sentinel-dashboard.jar包
1
| java -jar Sentinel-dashboard.jar包名
|
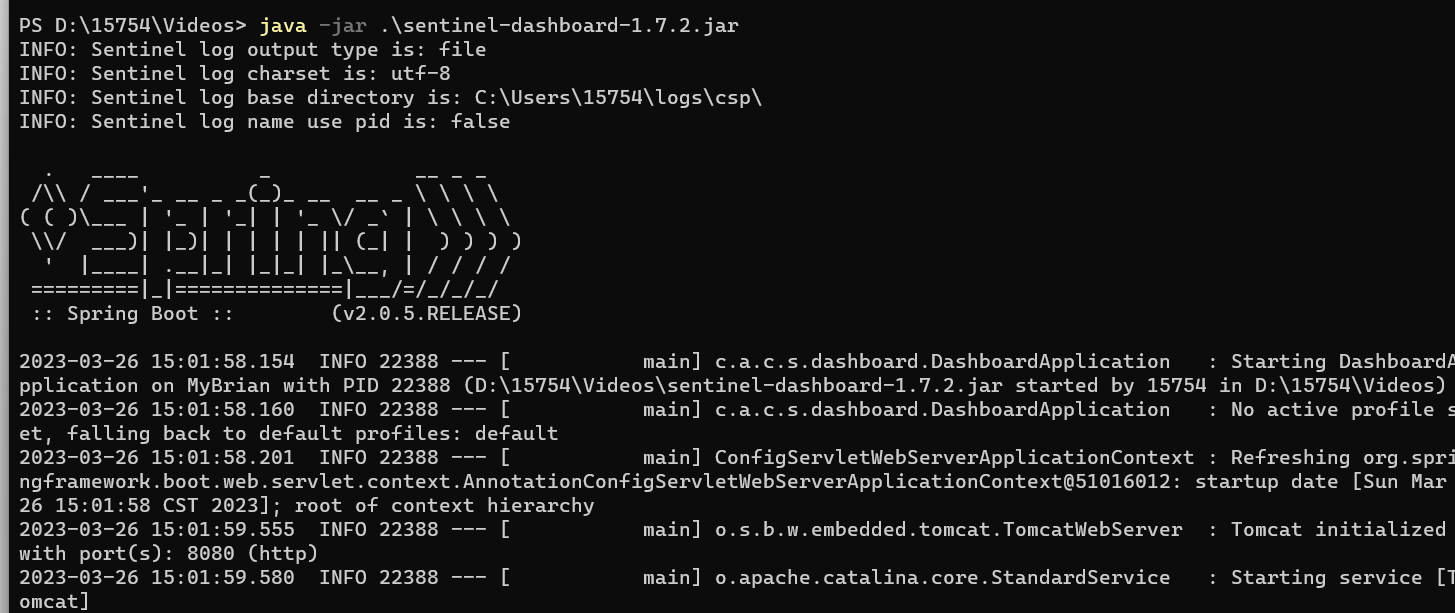
访问localhost:8080
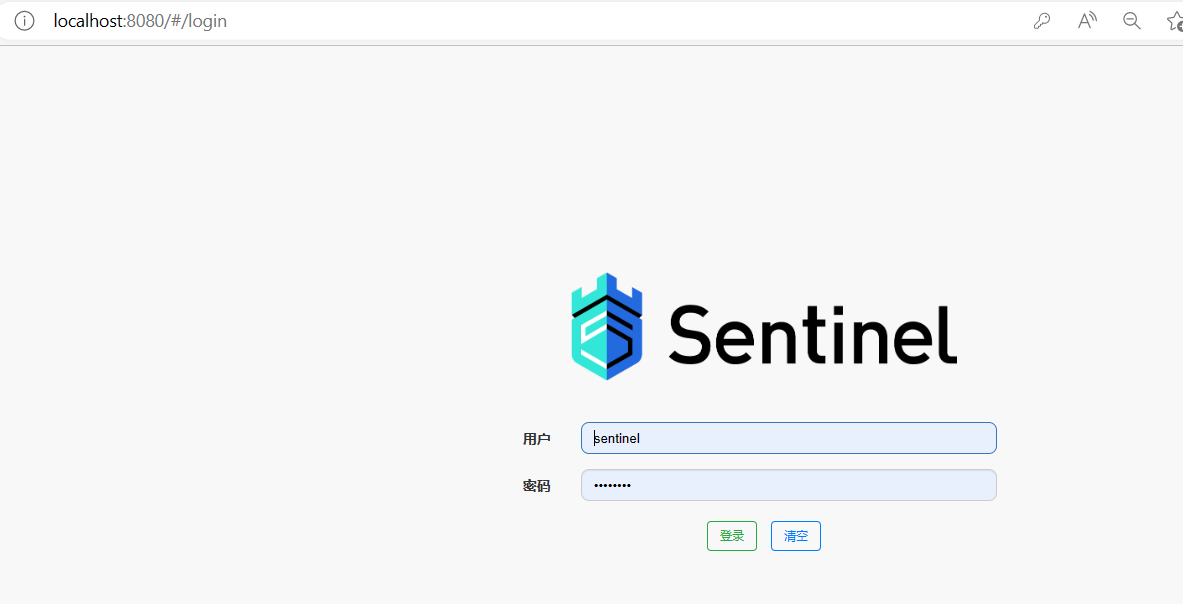
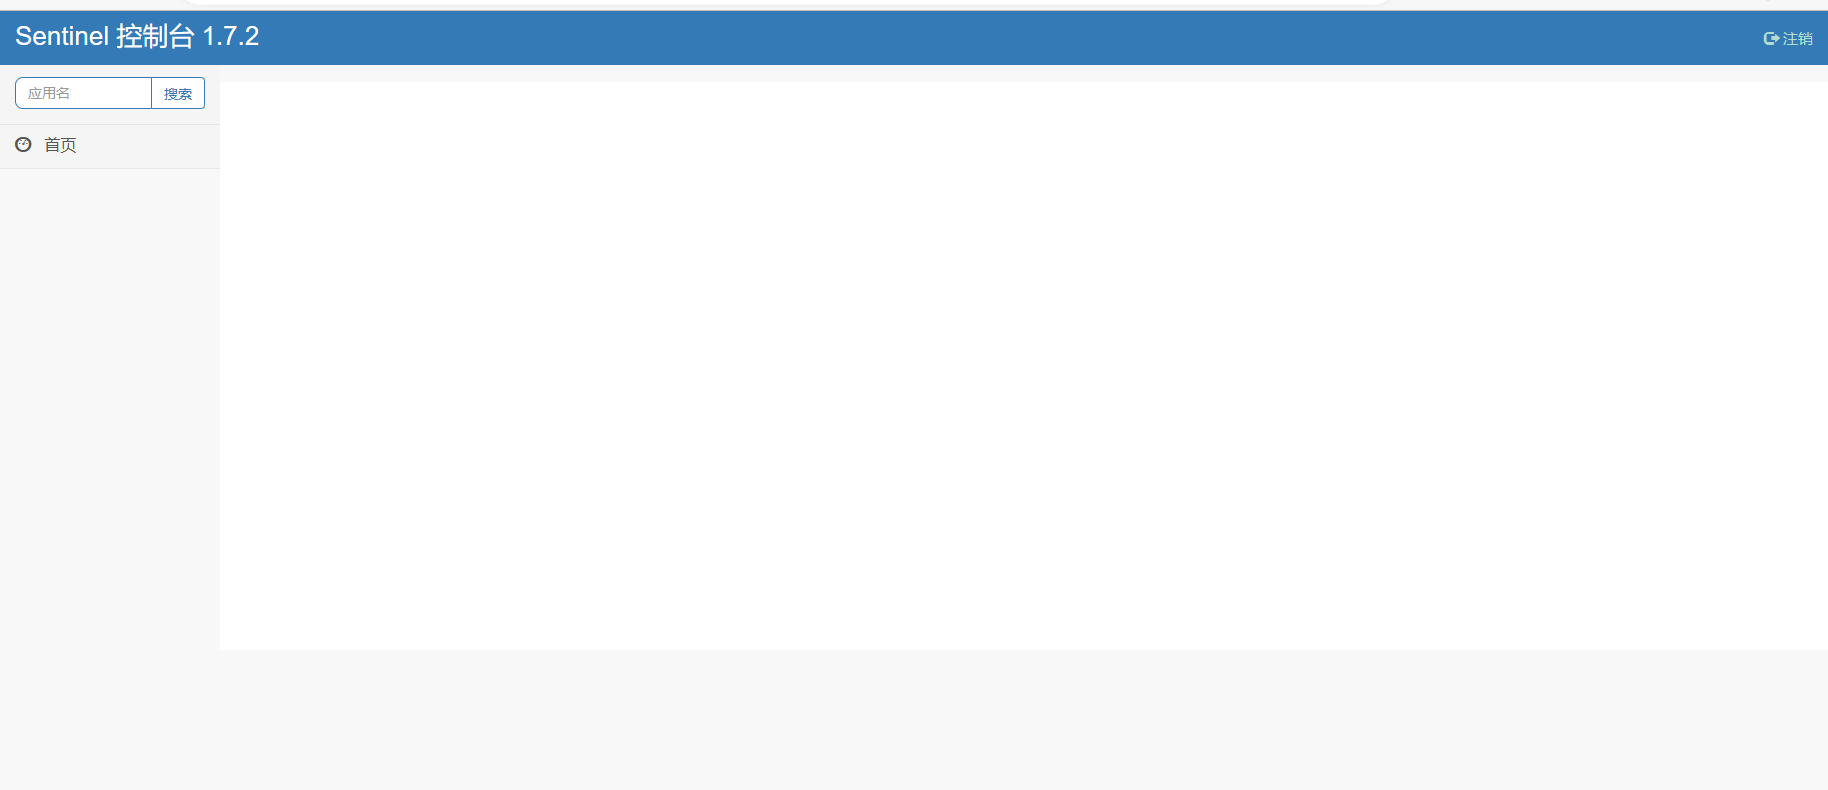
sentinel的默认的用户名和密码都是sentinel
Sentinel服务访问
我们创建Sentinel监控模块,测试一下Sentinel的使用场景
创建模块 cloudalibaba-sentinel-service8401
导入maven依赖
常用依赖
1
2
3
4
5
6
7
8
9
10
11
12
13
14
15
16
17
| <dependency>
<groupId>org.springframework.boot</groupId>
<artifactId>spring-boot-starter-web</artifactId>
</dependency>
<dependency>
<groupId>org.springframework.boot</groupId>
<artifactId>spring-boot-starter-actuator</artifactId>
</dependency>
<dependency>
<groupId>org.projectlombok</groupId>
<artifactId>lombok</artifactId>
<optional>true</optional>
</dependency>
<dependency>
<groupId>org.springframework.cloud</groupId>
<artifactId>spring-cloud-starter-openfeign</artifactId>
</dependency>
|
Sentinel所需依赖
1
2
3
4
5
6
7
8
9
10
11
12
13
14
15
|
<dependency>
<groupId>com.alibaba.cloud</groupId>
<artifactId>spring-cloud-starter-alibaba-nacos-discovery</artifactId>
</dependency>
<dependency>
<groupId>com.alibaba.csp</groupId>
<artifactId>sentinel-datasource-nacos</artifactId>
</dependency>
<dependency>
<groupId>com.alibaba.cloud</groupId>
<artifactId>spring-cloud-starter-alibaba-sentinel</artifactId>
</dependency>
|
配置文件
1
2
3
4
5
6
7
8
9
10
11
12
13
14
15
16
17
18
19
20
| server:
port: 8401
spring:
application:
name: cloudalibaba-sentinel-service
cloud:
nacos:
discovery:
server-addr: localhost:8848
sentinel:
transport:
dashboard: localhost:8080
port: 8719
management:
endpoints:
jmx:
exposure:
include: '*'
|
主启动类
1
2
3
4
5
6
7
8
9
10
11
12
13
14
15
16
| package com.atguigu.cloudalibaba;
import org.springframework.boot.SpringApplication;
import org.springframework.boot.autoconfigure.SpringBootApplication;
import org.springframework.cloud.client.discovery.EnableDiscoveryClient;
@SpringBootApplication
@EnableDiscoveryClient
public class sentinelMain8401 {
public static void main(String[] args) {
SpringApplication.run(sentinelMain8401.class,args);
}
}
|
访问测试
1
2
3
4
5
6
7
8
9
10
11
12
13
14
15
16
17
18
19
| package com.atguigu.cloudalibaba.controller;
import lombok.extern.slf4j.Slf4j;
import org.springframework.web.bind.annotation.GetMapping;
import org.springframework.web.bind.annotation.RestController;
@RestController
@Slf4j
public class FlowLimitController {
@GetMapping("/test1")
public void test1(){
log.info("这是测试1");
}
@GetMapping("/test2")
public void test2(){
log.info("这是测试2");
}
}
|
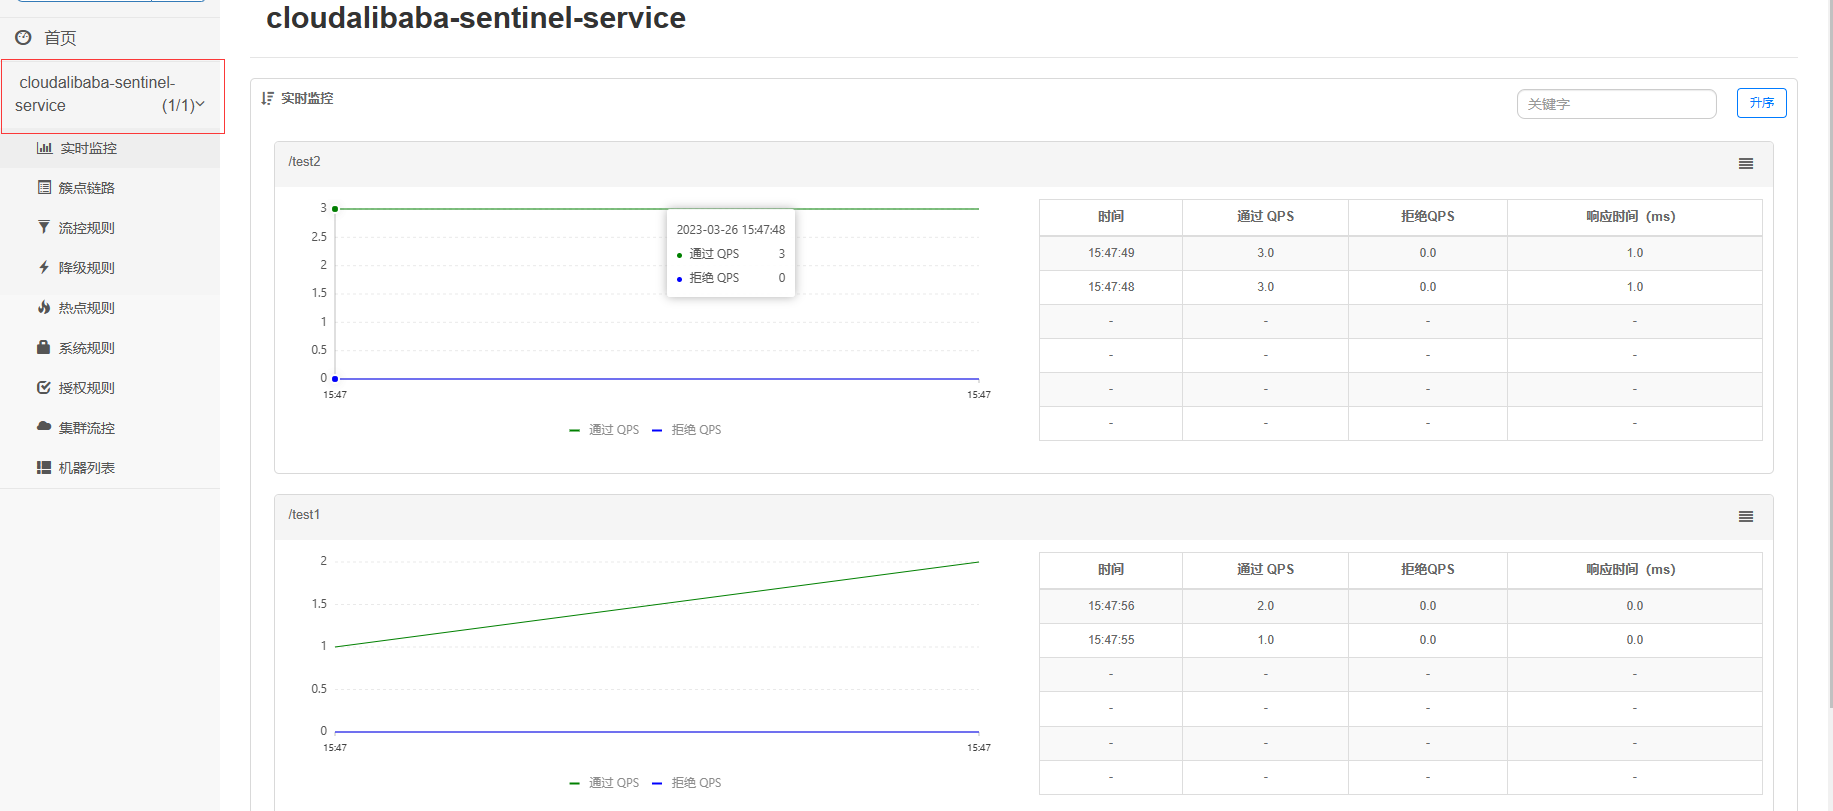
当我们启动服务时,登录控制台后,并未发现Sentinel有啥变化,当我们开始测试访问时
Sentinel流量控制
我们可以在控制台中对其中的连接链路做流量控制

快速失败
当该链路超过阈值及其所规定的类型会直接导致该次链路访问失败,一言不合就直接
快速失败的流量控制分为三种情况:直接,关联和链路
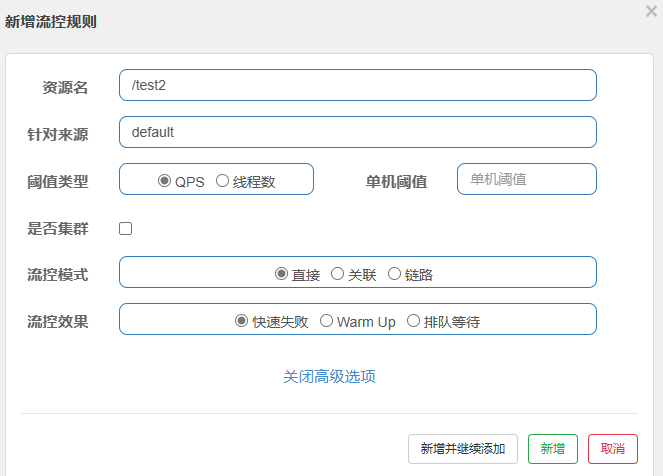
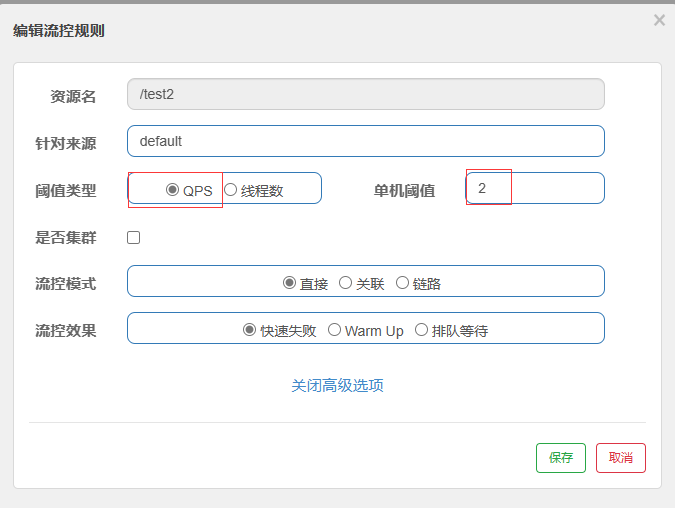
直接
例如我们设置QPS为阈值类型,阈值为2,则当一秒内超过2就会导致这一秒内的后续请求都会失败

关联
假设我们的test2(关联资源)是支付服务,test1(资源名)是商品订单服务,用户在下完订单后再对订单进行支付。
当我们的支付服务繁忙时就暂时对商品订单服务进行流量控制
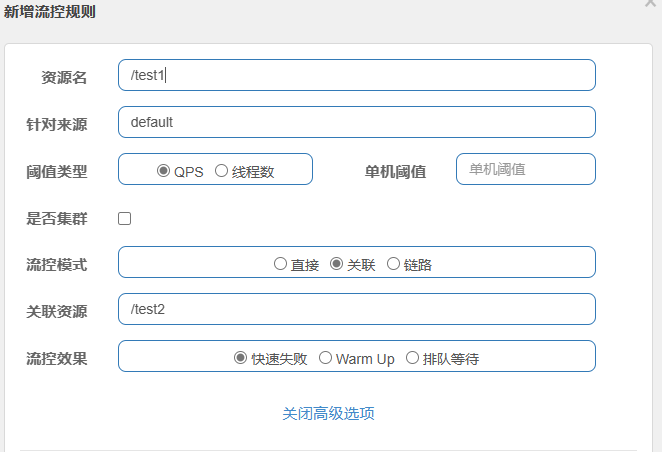
当我们对/test2狂刷了N次F5后,然后赶紧访问/test1,结果瞬间报错

预热(warm up)
大白话来讲,刚开始把 阈值调低,不要让过多的请求访问服务器,导致冲垮服务器,先让服务器一点一点处理,再慢慢加量。经典的例子:一个好久没运动的人,你刚开始让他跑10圈,他可能会累死,但是你给他一个预热时间,比如 第一天跑 2圈,第三天跑 3 圈,第四天跑4圈,以此类推…
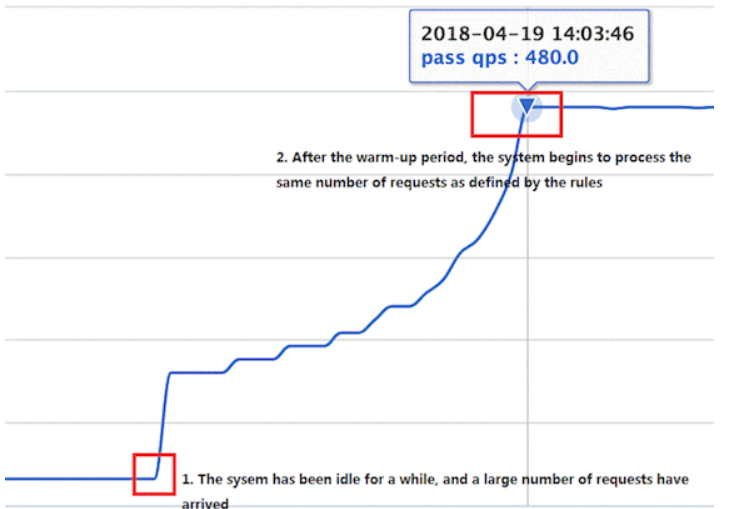
默认coldFactor为3,即请求QPS从(threshold / 3)开始,经多少预热时长才逐渐升至设定的QPS阈值。 如下案例,阀值为10,预热时长设置5秒。 系统初始化的阀值为10 / 3约等于3,即阀值刚开始为3,然后过了 5秒后阀值才慢慢升高恢复到10

实际测试,我们使用Jmter,将总访问数设为50 访问10s。所以大概每秒访问5次,当请求到来时,一开始我们访问是会报错的 3<5,当过了几秒后就会好起来

排队等待
当有许多请求来临时,我们可以设置阈值,当超过阈值时,就将请求拦在一个队列中,并设置请求超时时长,超时后就将请求直接剔除
Sentinel服务降级
Sentinel 提供以下几种熔断策略:
慢调用比例 (SLOW_REQUEST_RATIO):选择以慢调用比例作为阈值,需要设置允许的慢调用 RT(即最大的响应时间),请求的响应时间大于该值则统计为慢调用。当单位统计时长(statIntervalMs)内请求数目大于设置的最小请求数目,并且慢调用的比例大于阈值,则接下来的熔断时长内请求会自动被熔断。经过熔断时长后熔断器会进入探测恢复状态(HALF-OPEN 状态,1.8版本之前没有half-open模式) ,若接下来的一个请求响应时间小于设置的慢调用 RT 则结束熔断,若大于设置的慢调用 RT 则会再次被熔断。
异常比例 (ERROR_RATIO):当单位统计时长(statIntervalMs)内请求数目大于设置的最小请求数目,并且异常的比例大于阈值,则接下来的熔断时长内请求会自动被熔断。经过熔断时长后熔断器会进入探测恢复状态(HALF-OPEN 状态),若接下来的一个请求成功完成(没有错误)则结束熔断,否则会再次被熔断。异常比率的阈值范围是 [0.0, 1.0],代表 0% - 100%。
异常数 (ERROR_COUNT):当单位统计时长内的异常数目超过阈值之后会自动进行熔断。经过熔断时长后熔断器会进入探测恢复状态(HALF-OPEN 状态),若接下来的一个请求成功完成(没有错误)则结束熔断,否则会再次被熔断。
热点参数限流
何为热点?热点即经常访问的数据。很多时候我们希望统计某个热点数据中访问频次最高的 Top K 数据,并对其访问进行限制。比如:
- 商品 ID 为参数,统计一段时间内最常购买的商品 ID 并进行限制
- 用户 ID 为参数,针对一段时间内频繁访问的用户 ID 进行限制
热点参数限流会统计传入参数中的热点参数,并根据配置的限流阈值与模式,对包含热点参数的资源调用进行限流。热点参数限流可以看做是一种特殊的流量控制,仅对包含热点参数的资源调用生效。
对比hystrix ,Sentinel对其HystrixCommond注解有对应的注解SentinelResource
对于Sentinel的热点参数限流我们的执行流程如下
1
2
3
4
5
6
7
8
9
10
11
| Entry entry = null;
try {
entry = SphU.entry(resourceName, EntryType.IN, 1, paramA, paramB);
} catch (BlockException ex) {
} finally {
if (entry != null) {
entry.exit(1, paramA, paramB);
}
}
|
我们传入的参数 ParamA和ParamB,我们在控制台中对paramA设为热点参数,并且指定限流规则,当热点参数符合限流规则就会抛出异常(BlockException),则执行 其中的Handle函数最后执行finally代码
所以我们可以做的是,对于Handle函数的设定 ,默认的Handl 函数执行结果为
具体编码如下
1
2
3
4
5
6
7
8
9
10
11
12
| @GetMapping("/test4")
@SentinelResource(value = "test4",blockHandler = "deal_block")
public String test4(
@RequestParam(value = "p1",required = false) String s1,
@RequestParam(value = "p2",required = false) String s2
){
return "真服了,怎么可以这么好用"+s1+s2;
}
public String deal_block(String p1, String p2, BlockException blockException){
return "服务器炸了,请稍后再试哦";
}
|
我们的热点限流规则为

参数索引即为

p1索引为0,p2为1
当我们正常访问/test4时

当我们狂刷新时(疯狂访问)

这时我们想到了,如果在现有规则下我们去改变请求中参数的索引位置例如将现在索引为0的索引设置为索引为p2,如果p2参数错误,则会不会出现上面的结果

结果是不会,因为当我们在设置索引的时候,索引位置并没有和数据进行绑定,而是Sentinel底层通过索引记住了我们上面所写的代码,和@RestquestParam代码的先后顺序有关,将
1
2
| @RequestParam(value = "p2",required = false) String s2,
@RequestParam(value = "p1",required = false) String s1
|
调换位置,然后重启设置规则后我们会发现,请求参数为p2后快速刷新将会和 之前请求参数为p1时刷新情况一致
参数例外项
我们想象以下一个场景,三条公路每天都时车来车往,挤的不行,于是规则出现了,三条公路只能每条路每分钟走100辆车,但是三条公路还不一样宽,一条5m宽,一条10米宽,一条20米宽。若是根据以上规则的话,那么势必会出现有公路继续堵得不行(第一条),或者有的公路空闲的不行(第三条),所以我们需要根据每条公路来分配不同的规则
相同的我们访问的资源都是公路,若访问公路一,我们可以指定热点规则 例如走第一条公路所需访问的参数值为id= 1,第二天id=2,以此类推。
我们像根据id值或来指定不同的规则,所以参数例外项就来了
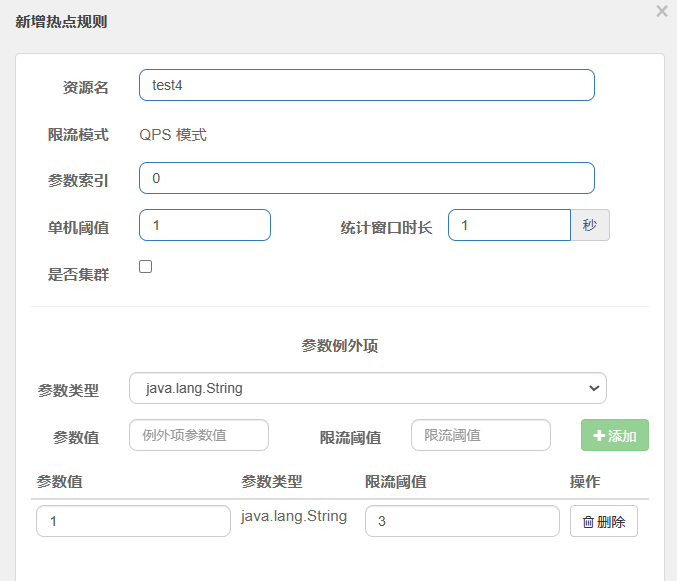

当p1值为1时,狂刷N次依旧可以访问
系统规则
Sentinel 系统自适应限流从整体维度对应用入口流量进行控制,结合应用的 Load、CPU 使用率、总体平均 RT、入口 QPS 和并发线程数等几个维度的监控指标,通过自适应的流控策略,让系统的入口流量和系统的负载达到一个平衡,让系统尽可能跑在最大吞吐量的同时保证系统整体的稳定性。
SentinelResource
定义了资源点之后,我们可以通过Dashboard控制台页面来设置限流和降级策略来对资源点进行保护。同时还能通过@SentinelResource注解来指定出现异常时的处理策略。
@SentinelResource用于定义资源,并提供可选的异常处理和fallback配置项。其主要参数如下:
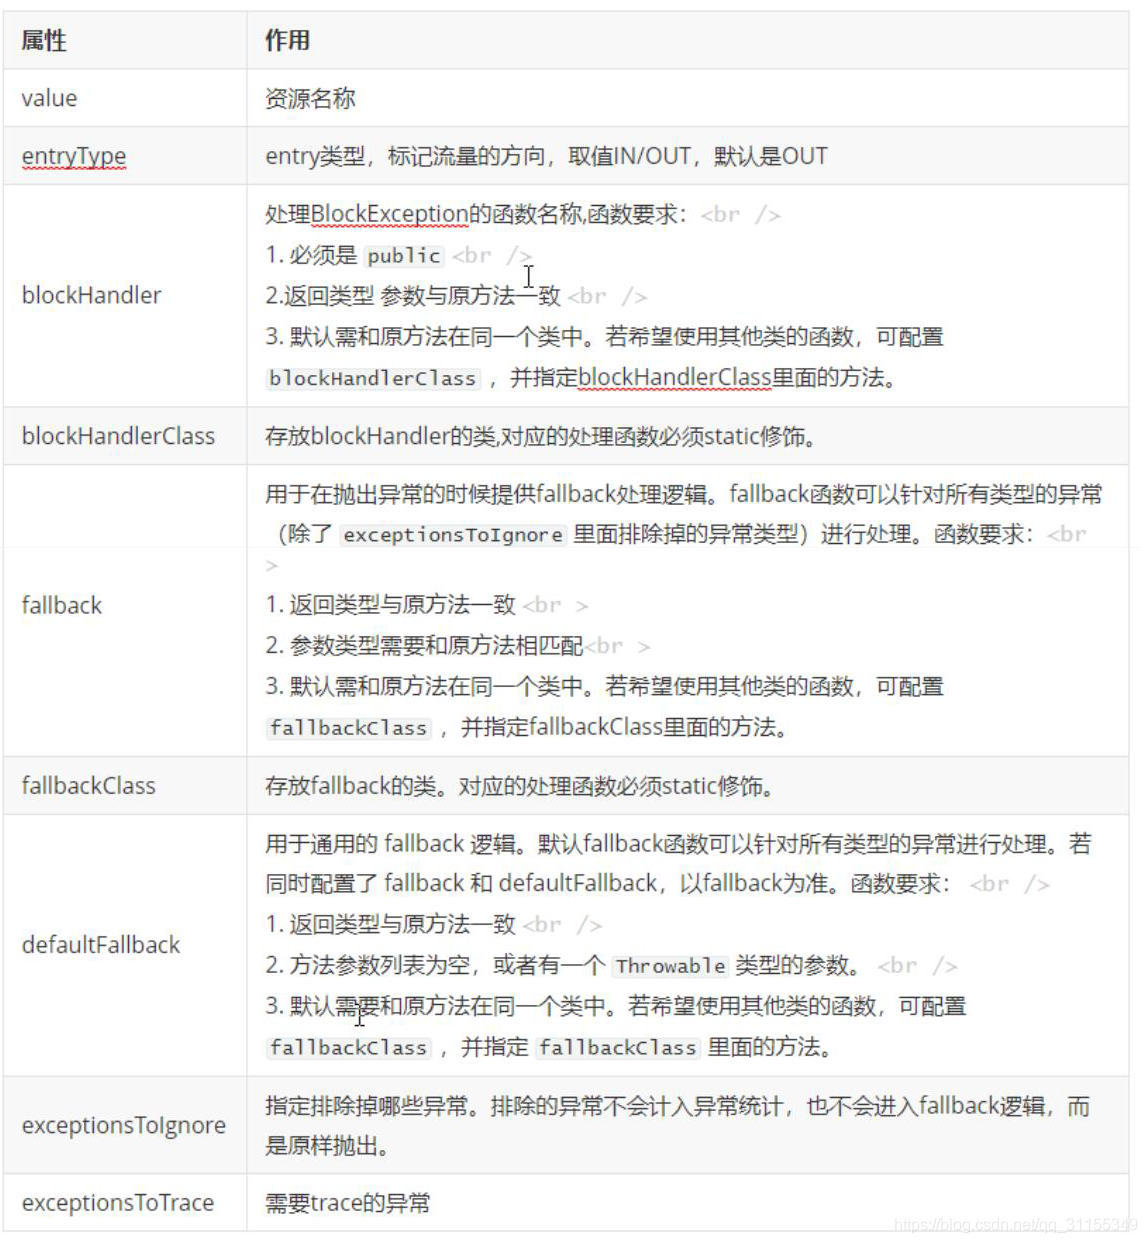
我们可以配置自定义的BlockHandle配置类和FallbackClass类
例如自定义BlockHandle配置类
1
2
3
4
5
6
7
8
9
10
11
12
13
14
15
16
17
| package com.atguigu.cloudalibaba.myHandler;
import com.alibaba.csp.sentinel.slots.block.BlockException;
import com.atguitu.springcloud.entities.CommentResult;
import org.springframework.context.annotation.Configuration;
@Configuration
public class CustomerBlockHandler {
public static CommentResult CustomerHandle1(BlockException blockException){
return new CommentResult(444,"全局自定义限流控制1") ;
}
public static CommentResult CustomerHandle2(BlockException blockException){
return new CommentResult(444,"全局自定义限流控制2") ;
}
}
|
在使用时
1
2
3
4
5
6
7
8
9
10
11
12
13
| @GetMapping("/rateLimit/byUrl")
@SentinelResource(value = "byUrl",blockHandlerClass = CustomerBlockHandler.class,blockHandler = "CustomerHandle1")
public CommentResult byUrlTest(){
return new CommentResult(200,"按照请求路径去进行流量限制",new Payment(2023L,"serial002"));
}
@GetMapping("/rateLimit/byUrl2")
@SentinelResource(value = "byUrl2",blockHandlerClass = CustomerBlockHandler.class,blockHandler = "CustomerHandle2")
public CommentResult byUrlTest2(){
return new CommentResult(200,"按照请求路径去进行流量限制",new Payment(2023L,"serial003"));
}
|
可根据不同的方法取调用不同的阻塞函数
Sentinel整合OpenFeign
当我们使用远程的服务调用时(Ribbon,OpenFeign),假设请求服务消费者方在调用服务提供者时,中间出现异常例如:超时,调用方法错误等等,但我们的服务提供者出现故障,并不能提供服务,此时该怎么办,所以我们需要用到OpenFeign的兜底函数
导入依赖
1
2
3
4
5
6
7
8
9
10
11
12
13
14
15
16
17
18
19
20
21
22
23
24
25
26
27
28
29
30
31
32
33
34
35
36
37
38
39
40
41
| <dependency>
<groupId>org.springframework.boot</groupId>
<artifactId>spring-boot-starter-web</artifactId>
</dependency>
<dependency>
<groupId>com.atguigu.springcloud</groupId>
<artifactId>cloud-api-commons</artifactId>
<version>${project.version}</version>
</dependency>
<dependency>
<groupId>org.springframework.boot</groupId>
<artifactId>spring-boot-starter-actuator</artifactId>
</dependency>
<dependency>
<groupId>com.alibaba.cloud</groupId>
<artifactId>spring-cloud-starter-alibaba-nacos-discovery</artifactId>
</dependency>
<dependency>
<groupId>com.alibaba.csp</groupId>
<artifactId>sentinel-datasource-nacos</artifactId>
</dependency>
<dependency>
<groupId>com.alibaba.cloud</groupId>
<artifactId>spring-cloud-starter-alibaba-sentinel</artifactId>
</dependency>
<dependency>
<groupId>org.projectlombok</groupId>
<artifactId>lombok</artifactId>
<optional>true</optional>
</dependency>
<dependency>
<groupId>org.springframework.cloud</groupId>
<artifactId>spring-cloud-starter-openfeign</artifactId>
</dependency>
|
配置文件
1
2
3
4
|
feign:
sentinel:
enabled: true
|
并且在服务消费者service层中@FeignClient注解中加入
1
2
3
4
5
6
7
|
@FeignClient(value = "nacos-payment-provider", fallback = PaymentFallbackService.class)
public interface PaymentService {
@GetMapping(value = "/paymentSQL/{id}")
public Result<Payment> paymentSQL(@PathVariable("id") int id);
}
|
1
2
3
4
5
6
7
8
9
|
@Component
public class PaymentFallbackService implements PaymentService {
@Override
public Result<Payment> paymentSQL(int id) {
return new Result<>(44444, "服务降级返回,---PaymentFallbackService", new Payment(id, "errorSerial"));
}
}
|
当服务提供者出现故障,服务消费者无法调用时,会直接执行函数PaymentFallbackService
Sentinel持久化
Sentinel做持久化,需要将配置注册进Nacos中
首先导入依赖
1
2
3
4
5
6
7
8
9
10
11
12
13
14
15
16
17
18
19
20
21
22
23
24
25
26
27
28
29
30
31
32
33
34
35
36
37
38
39
| server:
port: 8401
spring:
application:
name: cloudalibaba-sentinel-service
cloud:
nacos:
discovery:
server-addr: localhost:8848
sentinel:
transport:
dashboard: localhost:8080
port: 8719
datasource:
ds1:
nacos:
server-addr: localhost:8848
dataId: cloudalibaba-sentinel-service
groupID: DEFAULT_GROUP
data-type: json
rule-type: flow
management:
endpoints:
jmx:
exposure:
include: '*'
feign:
sentinel:
enabled: true
|


