SpringBoot

背景应用:

巴拉巴拉巴拉一堆,看官方文档去

SpringBoot2入门

首先先改一下maven仓库的配置:

将镜像改成

1
2
3
4
5
6
7
8
9
10
11
12
13
14
15
16
17
18
19
20
21
22
23
<mirrors>
<mirror>
<id>nexus-aliyun</id>
<mirrorOf>central</mirrorOf>
<name>Nexus aliyun</name>
<url>http://maven.aliyun.com/nexus/content/groups/public</url>
</mirror>
</mirrors>

<profiles>
<profile>
<id>jdk-1.8</id>
<activation>
<activeByDefault>true</activeByDefault>
<jdk>1.8</jdk>
</activation>
<properties>
<maven.compiler.source>1.8</maven.compiler.source>
<maven.compiler.target>1.8</maven.compiler.target>
<maven.compiler.compilerVersion>1.8</maven.compiler.compilerVersion>
</properties>
</profile>
</profiles>

然后开始进行编码

向创建一个Maven项目将依赖导入:

1
2
3
4
5
6
7
8
9
10
11
12
13
14
<parent>
<groupId>org.springframework.boot</groupId>
<artifactId>spring-boot-starter-parent</artifactId>
<version>2.3.4.RELEASE</version>
</parent>


<dependencies>
<dependency>
<groupId>org.springframework.boot</groupId>
<artifactId>spring-boot-starter-web</artifactId>
</dependency>

</dependencies>

然后创建文件夹形式

image-20220926135712125

MainApplication为负责启动Springboot的主程序:

1
2
3
4
5
6
7
8
9
10
11
12
13
package com.zhang.boot;
import org.springframework.boot.SpringApplication;
import org.springframework.boot.autoconfigure.SpringBootApplication;

/**
* @SpringbootApplication这是一个Springboot应用
* */
@SpringBootApplication
public class MainApplication {
public static void main(String []args){
SpringApplication.run(MainApplication.class,args);
}
}

@SpringBootApplication注解为标记该类为SpringBoot启动类

然后我们创建一个controller层

1
2
3
4
5
6
7
8
9
10
11
12
13
14
package com.zhang.boot.controller;


import org.springframework.web.bind.annotation.RequestMapping;
import org.springframework.web.bind.annotation.RestController;


@RestController
public class HelloController {
@RequestMapping("/hello")
public String handler01(){
return "helloSpringbooot2";
}
}

@RestController作用与 ResponeBody 加Controller一致

项目启动
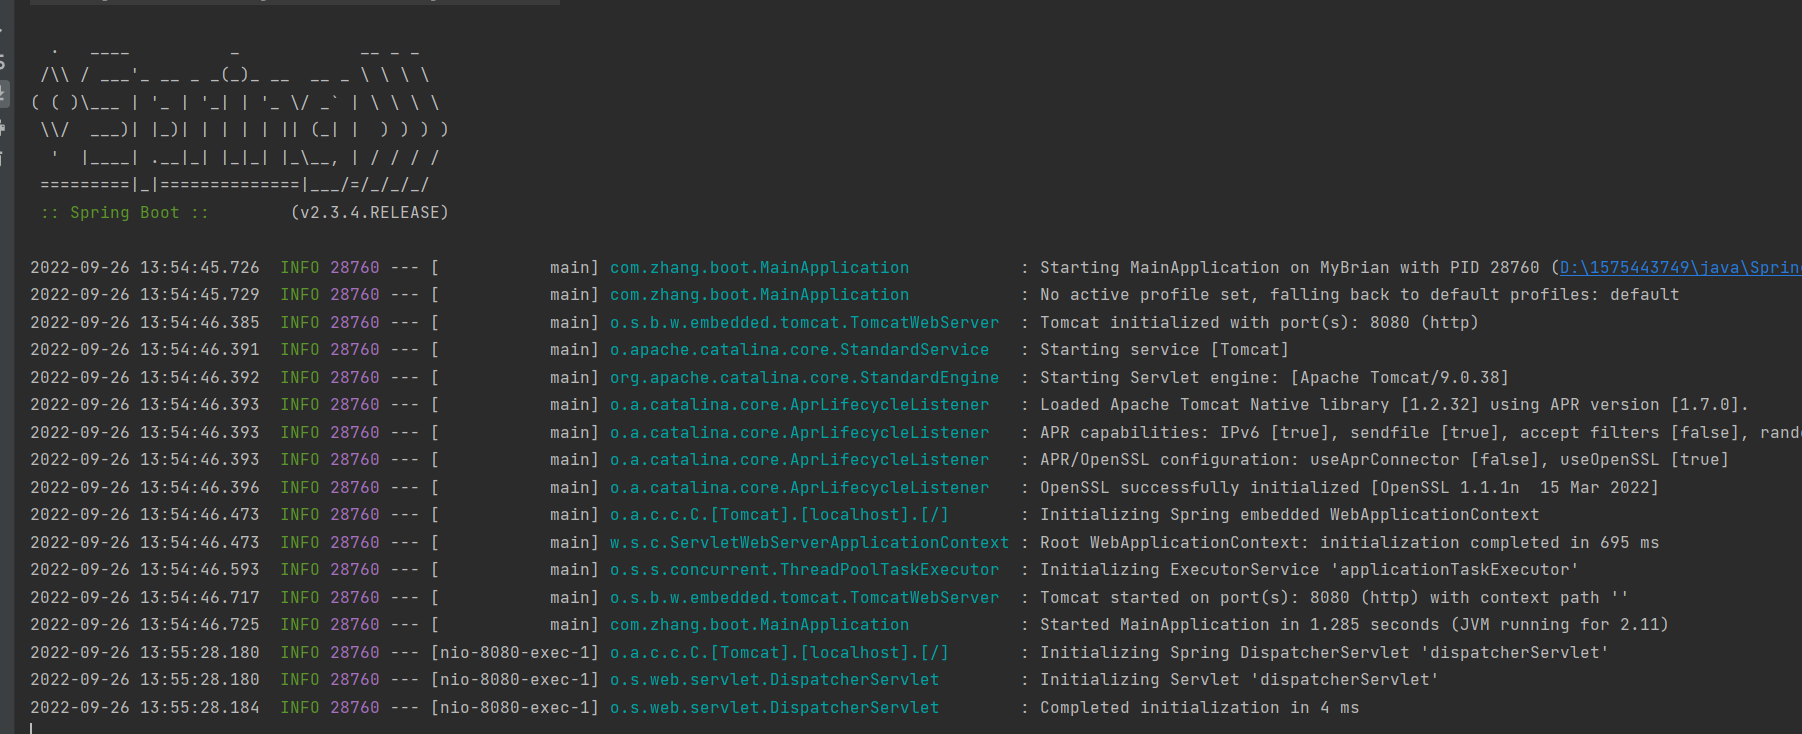
image-20220926140307894

image-20220926140330940

1、SpringBoot的Maven依赖管理

1
2
3
4
5
6
7
8
9
10
11
12
13
14
<parent>
<groupId>org.springframework.boot</groupId>
<artifactId>spring-boot-starter-parent</artifactId>
<version>2.3.4.RELEASE</version>
</parent>


<dependencies>
<dependency>
<groupId>org.springframework.boot</groupId>
<artifactId>spring-boot-starter-web</artifactId>
</dependency>

</dependencies>

以此依赖坐标为例

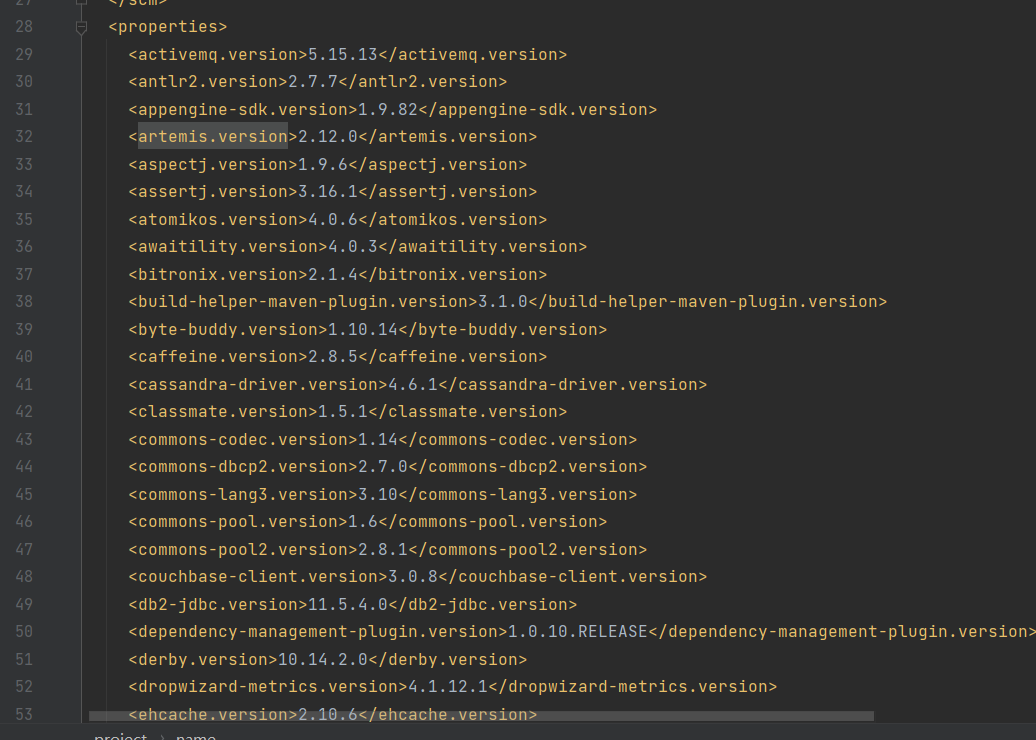
为父坐标, spring-boot-starter-parent此标签描述为一个SpringBoot项目的所需依赖的集合,该类规定了这个依赖内所导入的包的版本号,

当导入依赖时,可直接输入所导包的依赖,无需输入版本号

image-20220927001414562

倘若我们不使用该父类所提供的一些依赖的版本,我们可以自己设置版本

以mysql-Connector-java包为例

1
2
3
<properties>
<mysql.version>8.0.20</mysql.version>
</properties>

刷新maven即可生成8.0.20版本的mysql-Connector-java.jar

2、SpringBoot自动配置

  • 自动配置好Tomcat

    • 引入Tomcat依赖
    • 配置Tomcat
    1
    2
    3
    4
    5
    6
    <dependency>
    <groupId>org.springframework.boot</groupId>
    <artifactId>spring-boot-maven-plugin</artifactId>
    <version>2.3.4.RELEASE</version>
    </dependency>
    <!--引入一个WEB项目的环境依赖-->
  • 自动配置好了SpringMVC

    • 引入SpringMVC全套组件
    • 自动配置好SpringMVC的常用组件(功能)
  • 自动配好了WEB的常见功能 如:乱码问题

    • SpringBoot帮我们配置好了所有WEB开发的常见场景
  • 默认包的结构

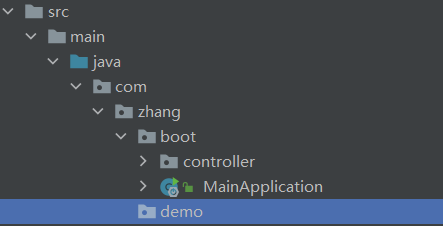
    • 主程序所在的包及其下边所有子包下面的组件都会被默认扫描进来

    • 例如:

      image-20220927005731252

      MainApplication为此项目的主程序,他所在的包为boot包,controller包也在boot包下,若在demo包下创建其他项目,则不受此SpringBoot的项目约束,

      若非要在其他包下创建模块别被该SpringBoot所约束,则需要在MainApplication类下的注解@SpringBootApplication中添加属性(scanBasePackageClasses = “xxx.xxx.xxx”)或者用ComponentScan指定路径

    • 无需之前的包扫描配置

  • 各种配置拥有默认值

    • 默认配置最终都是映射到MutippartProperties
    • 配置文件的值最终会绑定到每个类上,这个类会在容器中创建对象
  • 按需加载所有配置项

    • 引入了那些场景这个场景的自动配置才会开启

    • SpringBoot所有的自动配置功能都在Spring-boot-autoconfigure

    • 在我们的Maven配置中我们导入的是web的开发启动器

    • ```xml

      org.springframework.boot spring-boot-starter-web
      1
      2
      3
      4
      5
      6
      7
      8
      9
      10
      11
      12
      13
      14
      15
      16

      如果我们要是用批处理开发启动器的话,我们需要在配置中再加入该启动器的依赖坐标

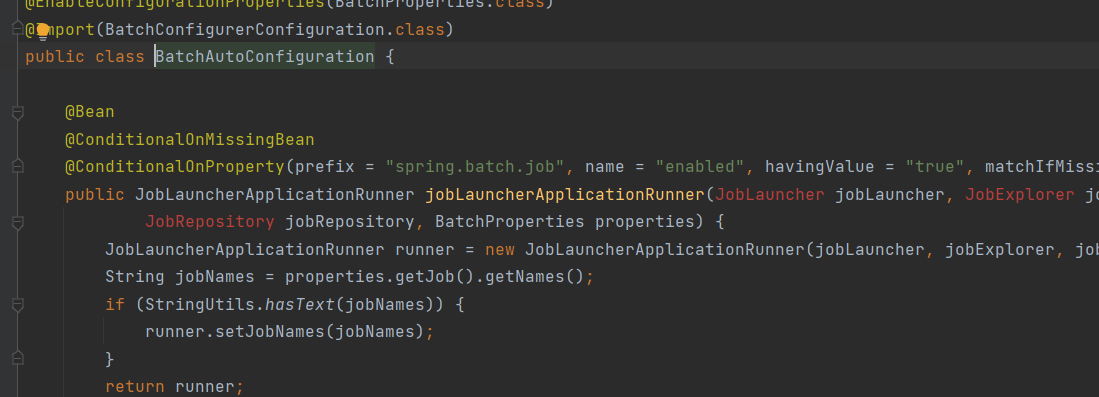
      在Spring-boot-autoconfigure包下我们可以看到批处理启动器没被 放入maven时的源码
      ![image-20220927012517361](https://img.hasdsd.cn/imgimage-20220927012517361.png)

      尚且爆红

      当我们导入依赖坐标:

      ```xml
      <dependency>
      <groupId>org.springframework.boot</groupId>
      <artifactId>spring-boot-starter-batch</artifactId>
      </dependency>

    image-20220927012600179

    在我们的启动类(主类)MainApplication中我们执行的SpringApplication.run方法返回的是一个ConfigurableApplicationContext类,其原理相当于我们拿到一了该项目的IOC,我们可以调用方法获取所有配置项如下图所示

    1
    2
    3
    4
    5
    6
    7
    8
    9
    10
    11
    12
    13
    14
    15
    16
    17
    18
    19
    package com.zhang.boot;
    import org.springframework.boot.SpringApplication;
    import org.springframework.boot.autoconfigure.SpringBootApplication;
    import org.springframework.context.ConfigurableApplicationContext;

    /**
    * @SpringbootApplication这是一个Springboot应用
    * */
    @SpringBootApplication
    public class MainApplication {
    public static void main(String []args){

    ConfigurableApplicationContext run = SpringApplication.run(MainApplication.class, args);
    String[] beanDefinitionNames = run.getBeanDefinitionNames();
    for(String name:beanDefinitionNames){
    System.out.println(name);
    }
    }
    }

    执行结果图下图所示

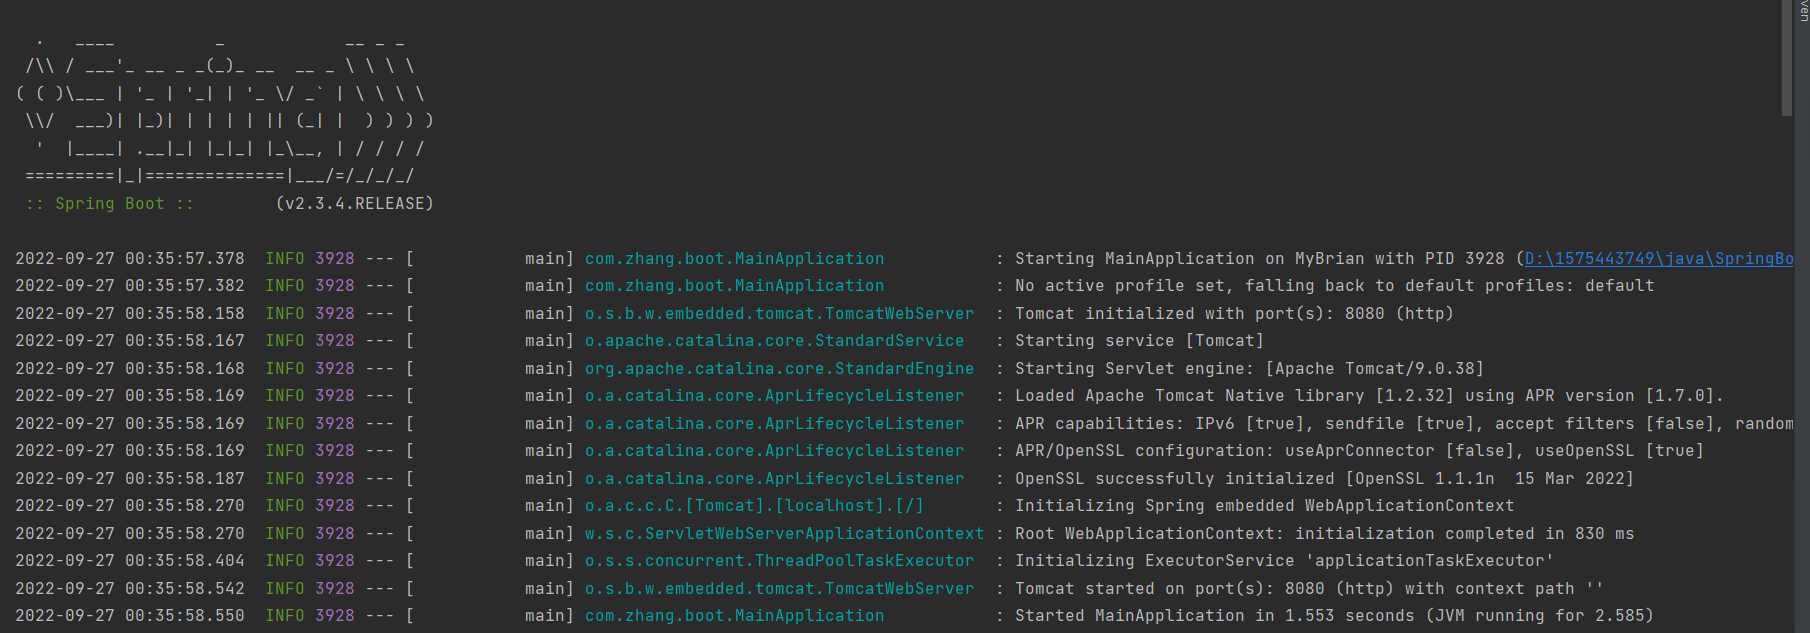
    SpringBoot启动图

image-20220927004742114

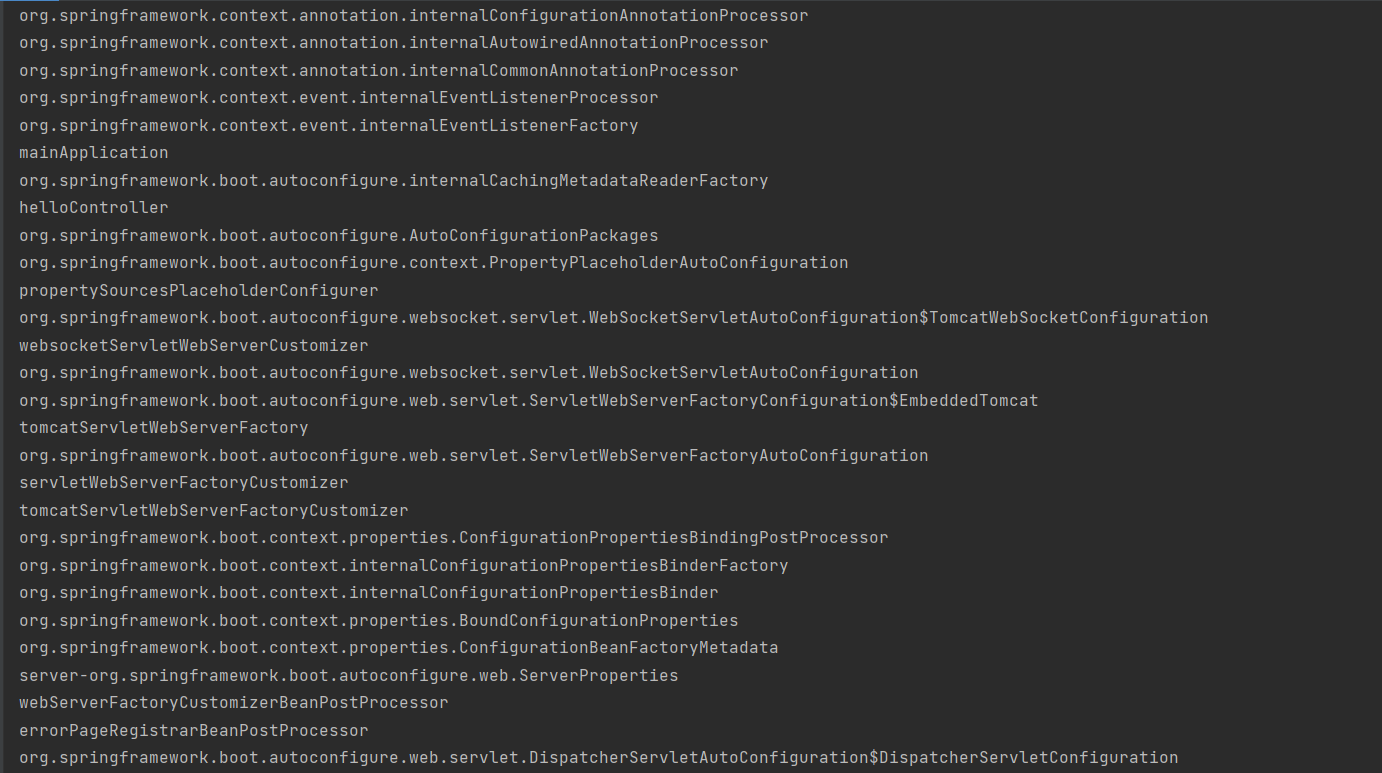
输出结果为image-20220927004908627

……

输出结果中都为SpringBoot所默认配置的包名类名

3、SpringBoot容器功能

@Configuration(proxyBeanMethods = true)

保证每个@Bean方法被调用多少次返回的组件都是单实例的

@Configuration(proxyBeanMethods = true)

每个@Bean方法被调用多少次返回的组件都是新创建的

@Import({User.class, DBHelper.class})

  •  给容器中自动创建出这两个类型的组件、默认组件的名字就是全类名
    

条件装配:@ConditionalOnBean(name=”XXX”)将此标签放入某个组件上时,若容器中有XXX则就讲该组件加入容器

@ConditionalOnMissingBean(name=”XXX”)将此标签放入某个组件上时,若容器中没有XXX则就讲该组件加入容器

1
2
3
4
5
6
7
8
9
10
11
12
13
14
public class MainApplication {
public static void main(String []args){

ConfigurableApplicationContext run = SpringApplication.run(MainApplication.class, args);
String[] beanDefinitionNames = run.getBeanDefinitionNames();
for(String name:beanDefinitionNames){
System.out.println(name);
}
boolean user01 = run.containsBean("user01");
System.out.println("容器中User01组件:"+user01);
boolean tom = run.containsBean("tom");
System.out.println("容器中Tom组件"+tom);
}
}

run.containsBean(“XXX”)表示为容器中是否有组件XXX

底层的注解:

@ConfigurationProperties(prefix=”xxxx”)

当我们在配置文件中实现对容器中某个组件的注入时,首先该注解会搜寻配置文件中的某条注入的前缀和prefix一致,然后实现属性的注入

1
2
3
4
5
6
7
8
9
10
11
12
13
14
15
/**
*
* 只有在容器中的组件,才能拥有SpringBoot提供的强大功能
* **/
@Data
@AllArgsConstructor
@NoArgsConstructor
@ToString

@ConfigurationProperties(prefix = "mycar")
//从配置中寻找属性前缀mycar然后实现注入
public class Car {
private String brand;
private int price;
}

@EnableConfigurationProperties(XX.class)

如果我们要实现属性的注入首先要先将该类(XX)放入容器中

1
2
3
4
5
6
7
8
9
10
11
12
13
14
15
16
17
18
19
@Import({User.class, DBHelper.class})
@Configuration(proxyBeanMethods = true)
@EnableConfigurationProperties(Car.class)
//1.开启Car的配置绑定功能
//2.把Car这个组件自动注册到容器中
public class MyConfig {

@Bean("tom")
public Pet Tomcatpet(){
return new Pet("tomcat",1);
}
@ConditionalOnBean(name="tom")//存在tom组件才能添加user01组件
@Bean //给容器中添加组件,以方法名作为组件的id,返回类型就是组件类型,返回的值就是组件在容器中的实例
public User user01(){
User user1=new User("张锋",18);
user1.setPet(Tomcatpet());
return user1;
}
}

Controller层代码:

1
2
3
4
5
6
@Autowired
Car car;
@RequestMapping("/car")
public Car car(){
return car;
}

配置文件

1
2
mycar.brand=nono
mycar.price=150000

输出结果

image-20220928144636586

4、@SpringBootApplication

@SpringBootApplication表示该类时SpringBoot的主类,它由三个注解组成:@SpringBootConfiguration、@ComponentScan、@EnableAutoConfiguration

  1. @SpringBootConfiguration:代表当前时一个配置类

  2. @ComponentScan:指定扫描哪些Spring注解

  3. @EnableAtuoConfiguration它由以下注解组成:

  4. ```java
    @AutoConfigurationPackage
    @Import(AutoConfigurationImportSelector.class)
    public @interface EnableAutoConfiguration {}

    1
    2
    3
    4
    5
    6
    7
    8

    @AutoConfiguratnionPackage:自动配置包它由以下注解组成

    ```java
    @Import(AutoConfigurationPackages.Registrar.class)//给容器中导入一个组件
    public @interface AutoConfigurationPackage {}
    //利用Register导入一系列组件
    //将指定的一个包下的组件导入进来?MainApplication所在包下的Bean全部注册

​ @Import(AutoConfigurationImportSelector.class)

​ AutoConfigurationImportSelector类中有一个方法:selectImport

1
2
3
4
5
1、getAutoConfigurationEntry(annotationMetadata);//利用容器中批量导入一些组件
2、List<String> configurations = getCandidateConfigurations(annotationMetadata, attributes);//获取到所有需要导入到容器中的配置类
3、Map<String, List<String>> loadSpringFactories(@Nullable ClassLoader classLoader)//获取所有需要导入的组件
4、从"META-INF/spring.factories"位置来加载一个文件
默认扫描当前系统中"META-INF/spring.factories"位置的所有文件 spring-boot-2.3.4.RELEASE.jar中也有META-INF.spring.factories

SpringBoot在启动的时候,按需开启自动配置项

image-20220929004440051

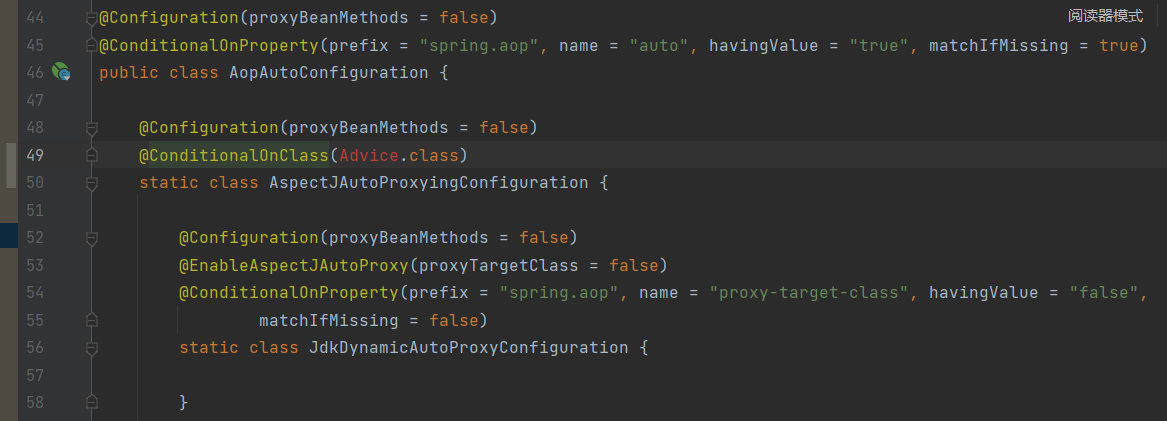
比如AOP包下,@ConditionalOnClass(Advice.class)当容器中存在Advice类的时候才加载AOP组件

总结:

  • Spring先加载所有的自动配置类
  • 每个自动;配置类按照条件进行生效,默认的配置都会绑定配置文件的值。XXXXXproperties里面拿。XXXXproperties和配置文件进行了绑定
  • 生效的配置类,就会给容器中装配很多的组件
  • 只要容器中有这些组件,相当于这些功能就有了
  • 只要用户有自己配置的,就以用户的优先
  • 定制化配置
    • 用户直接自己@Bean替代底层组件
    • 用户去看这个组件时获取的的配置文件的什么值就去修改

XXXXXAutoConfiguration–>组件—->XXXXProperties里面拿值—–>application.properties

5、yaml

​ YAML 入门教程

分类 编程技术

YAML 是 “YAML Ain’t a Markup Language”(YAML 不是一种标记语言)的递归缩写。在开发的这种语言时,YAML 的意思其实是:”Yet Another Markup Language”(仍是一种标记语言)。

基本语法

  • 大小写敏感

  • 使用缩进表示层级关系

  • 缩进不允许使用tab,只允许空格

  • 缩进的空格数不重要,只要相同层级的元素左对齐即可

  • ‘#’表示注释

  • 对象键值对使用冒号结构表示 key: value,冒号后面要加一个空格。

    也可以使用 **key:{key1: value1, key2: value2, …}**。

    还可以使用缩进表示层级关系;

    1
    2
    3
    key: 
    child-key: value
    child-key2: value2

    较为复杂的对象格式,可以使用问号加一个空格代表一个复杂的 key,配合一个冒号加一个空格代表一个 value:

    1
    2
    3
    4
    5
    6
    ?  
    - complexkey1
    - complexkey2
    :
    - complexvalue1
    - complexvalue2

    意思即对象的属性是一个数组 [complexkey1,complexkey2],对应的值也是一个数组 [complexvalue1,complexvalue2]

    YAML 数组

    - 开头的行表示构成一个数组:

    1
    2
    3
    - A
    - B
    - C

    YAML 支持多维数组,可以使用行内表示:

    1
    key: [value1, value2, ...]

    数据结构的子成员是一个数组,则可以在该项下面缩进一个空格。

    1
    2
    3
    4
    -
    - A
    - B
    - C

6、web开发

静态规则与定制化

  1. ​ 静态资源目录

    1. 只要静态资源放到:static,public,resource,META-INF。访问时只需要加上根路径“/”加上静态文件名即可完成访问

      • 原理:请求映射/** 。当服务器收到浏览器请求时,先去找Controller层看能不能处理。如果能处理,直接返回,不能处理的所有请求都交给静态资源管理器,倘若静态资源能找到,直接返回,若静态资源也找不到则会爆404
    2. 改变默认静态资源路径

    3. ```yaml
      web:
      resources:
      static-locations: classpath:/love/ #(你想要设置的默认静态资源访问路径,比如说love)
      ##要有一点注意,无论怎么修改默认静态资源路径,META-INF/resources/*下的静态资源依旧可以访问到

      1
      2
      3
      4
      5
      6
      7
      8
      9
      10

      2. 静态资源访问前缀

      1. 默认无前缀(“/**”)

      2. ```yaml
      spring:
      mvc:
      static-path-pattern: /resources/** #表示访问默认静态资源访问访问前缀为/resources/**
      #要得到静态资源那么请求就应该是:当前项目+static-path-pattern

欢迎页支持

  • 静态资源路径下 index.html
    • 可以配置静态资源路径
    • 但是不可以配置静态资源的访问前缀,否则导致index.html不能被默认访问
1
2
3
4
5
6
spring:
# mvc:
# static-path-pattern: /res/**
web:
resources:
static-locations: classpath:/love/ #(你想要设置的默认静态资源访问路径,比如说love)
  • controller能处理/index
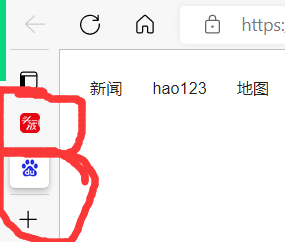
  • 若要修改浏览器的默认小图标如下图则需要将小图标的名称改为favicon.ico即可
  • image-20221001150948554

静态资源配置管理

  • springboot默认加载xxxAutoConfiguration类(该自动配置类)
  • SpringMVC功能自动配置类, WebMvcAutoConfiguration,生效
1
2
3
4
5
6
7
8
@AutoConfiguration(
after = {DispatcherServletAutoConfiguration.class, TaskExecutionAutoConfiguration.class, ValidationAutoConfiguration.class}
)
@ConditionalOnWebApplication(
type = Type.SERVLET
)
@ConditionalOnClass({Servlet.class, DispatcherServlet.class, WebMvcConfigurer.class})
@ConditionalOnMissingBean({WebMvcConfigurationSupport.class})

给容器中配置了什么

1
2
3
4
5
6
7
@Configuration(
proxyBeanMethods = false
)
@Import({WebMvcAutoConfiguration.EnableWebMvcConfiguration.class})
@EnableConfigurationProperties({WebMvcProperties.class, WebProperties.class})
@Order(0)
public static class WebMvcAutoConfigurationAdapter implements WebMvcConfigurer, ServletContextAware {}

配置文件的相关属性和xxx进行绑定,WebMvcProperties=springmvc和WebPropertiies=springresources

1
2
3
4
5
6
7
8
9
10
11
12
13
14
15
16
17
18
19
//有参构造器的所有值都要在容器中确定
//WebProperties webProperties获取sping.web绑定所有值的对象
//WebMvcProperties mvcProperties,获取sping.mvc绑定所有值的对象
//ListableBeanFactory beanFactory, spring的beanfactory(spring的容器)
//HttpMessageConverters , 找到所有的HttpMessageConverters
//ResourceHandlerRegistrationCustomizer 找到资源处理器的自定义器
//dispatcherServletPath, 它所能处理的路径
//ServletRegistrationBean 给应用注册Servelet、Filter。。。。
public WebMvcAutoConfigurationAdapter(WebProperties webProperties, WebMvcProperties mvcProperties, ListableBeanFactory beanFactory, ObjectProvider<HttpMessageConverters> messageConvertersProvider, ObjectProvider<WebMvcAutoConfiguration.ResourceHandlerRegistrationCustomizer> resourceHandlerRegistrationCustomizerProvider, ObjectProvider<DispatcherServletPath> dispatcherServletPath,
ObjectProvider<ServletRegistrationBean<?>> servletRegistrations) {
this.resourceProperties = webProperties.getResources();
this.mvcProperties = mvcProperties;
this.beanFactory = beanFactory;
this.messageConvertersProvider = messageConvertersProvider;
this.resourceHandlerRegistrationCustomizer = (WebMvcAutoConfiguration.ResourceHandlerRegistrationCustomizer)resourceHandlerRegistrationCustomizerProvider.getIfAvailable();
this.dispatcherServletPath = dispatcherServletPath;
this.servletRegistrations = servletRegistrations;
this.mvcProperties.checkConfiguration();
}

资源处理默认规则

1
2
3
4
5
6
7
8
9
10
11
12
13
14
15
public void addResourceHandlers(ResourceHandlerRegistry registry) {
if (!this.resourceProperties.isAddMappings()) {//首先拿到我们的静态资源配置文件,判断是否启用了所有的静态资源,如果为false则会在debug中输出Default resource handling disabled
logger.debug("Default resource handling disabled");
} else {
this.addResourceHandler(registry, "/webjars/**", "classpath:/META-INF/resources/webjars/");
this.addResourceHandler(registry, this.mvcProperties.getStaticPathPattern(), (registration) -> {
registration.addResourceLocations(this.resourceProperties.getStaticLocations());
if (this.servletContext != null) {
ServletContextResource resource = new ServletContextResource(this.servletContext, "/");
registration.addResourceLocations(new Resource[]{resource});
}

});
}
}

禁用所有静态资源

1
2
3
4
spring:
web:
resources:
add-mappings: false

请求参数处理

倘若我们要执行前端的请求处理例如GET请求,POST请求,DELETE请求或PUT请求时,我们对应的Controller 层需要写成Rest风格

所以我们的Controller层代码为:

1
2
3
4
5
6
7
8
9
10
11
12
13
14
15
16
@RequestMapping(value = "/user",method = RequestMethod.GET)
public String getUser(){
return "GET-张三";
}
@RequestMapping(value = "/user",method = RequestMethod.POST)
public String saveUser(){
return "POST-张三";
}
@RequestMapping(value = "/user",method = RequestMethod.DELETE)
public String deleteUser(){
return "DELETE-张三";
}
@RequestMapping(value = "/user",method = RequestMethod.PUT)
public String putUser(){
return "PUT-张三";
}

问题出来了,请求映射都是”/user”,怎么区分所要映射的值呢,method=RequstMethod.XXX(PUT,POST,GET,DELETE)

但是同样的我们发现当前端请求类型为PUT,POST,GET,DELETE时,我们只能接收到”GET-张三”或”POST-张三”,无法输出其他两个

这时候我们需要隐藏请求(以表单删除为例)

1
2
3
4
<form action="/user" method="post">
<input name="_method" type="hidden" value="DELETE">
<input value="REST-DELETE提交" type="submit"/>
</form>

同样的我们需要在application.yaml里面添加参数:

1
2
3
4
5
spring:
mvc:
hiddenmethod:
filter:
enabled: true

启用我们的隐藏请求方法

如何设置隐藏的请求方法名称:

首先我们需要找到类HiddenHttpMethodFilter,其中就有方法setMethodParam,我们输入参数就可以改变隐藏请求方法名称

1
2
3
4
5
6
7
8
public class WebConfig {
@Bean
public HiddenHttpMethodFilter hiddenHttpMethodFilter(){
HiddenHttpMethodFilter methodFilter =new HiddenHttpMethodFilter();
methodFilter.setMethodParam("_m");
return methodFilter;
}
}

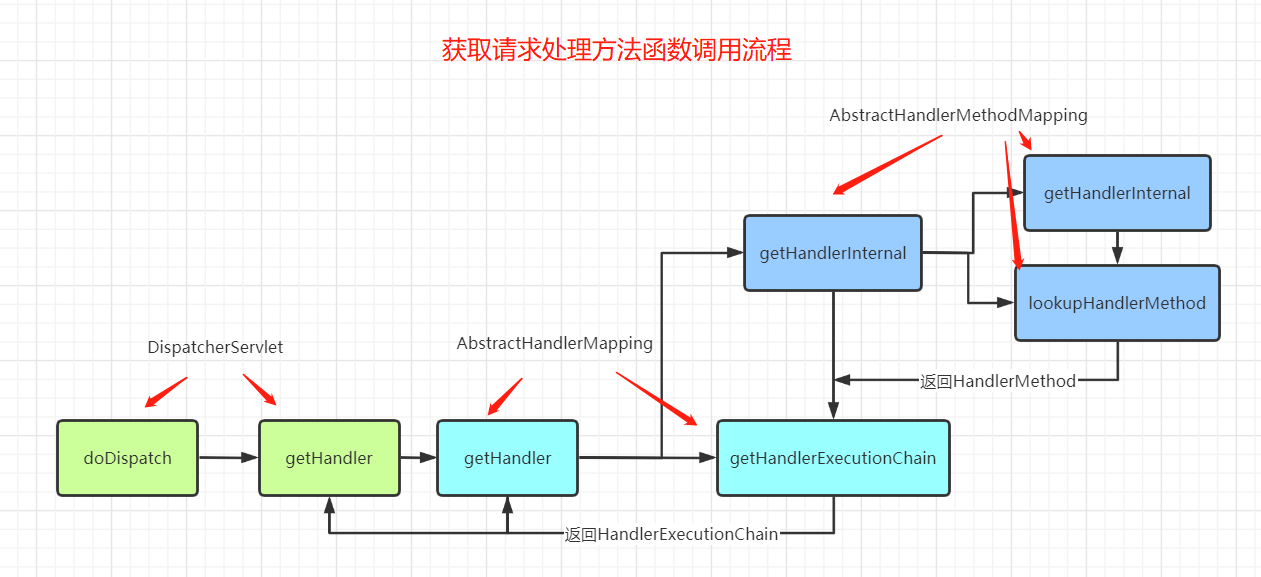
请求映射原理

image-20221008232208366

springMVC分析都从DispatcherServlet的doDispatch

1
2
3
4
5
6
7
8
9
10
11
12
13
14
15
16
17
18
protected void doDispatch(HttpServletRequest request, HttpServletResponse response) throws Exception {
HttpServletRequest processedRequest = request;
HandlerExecutionChain mappedHandler = null;
boolean multipartRequestParsed = false;

WebAsyncManager asyncManager = WebAsyncUtils.getAsyncManager(request);

try {
ModelAndView mv = null;
Exception dispatchException = null;

try {
processedRequest = checkMultipart(request);
multipartRequestParsed = (processedRequest != request);

// 找到当前请求是由那个Handler(Controller方法)处理
mappedHandler = getHandler(processedRequest);
//HandlerMapping 处理器映射

image-20221009001157528

RequestMappingHandlerMapping保存了所有的RequestMapping和HandlerMapping的映射规则

详情见(44条消息) 浅析Spring Boot请求映射原理_风在哪的博客-CSDN博客
img

常用参数注解使用

@PathVariable(路径变量)

在运用rest风格中,可以获取路径中的变量例如

1
2
3
4
5
6
7
8
9
10
11
@GetMapping("/car/{id}/owner/{username}")
public Map<String,Object> getCar(@PathVariable("id") Integer id,
@PathVariable("username") String name,
@PathVariable Map<String,String> pv
){
Map<String,Object> map=new HashMap<>();
map.put("id",id);
map.put("name",name);
map.put("pv",pv);
return map;
}

前端页面代码为

1
<a href="/car/3/owner/lisi">car/{id}/owner/{username}</a>

输出结果为

image-20221009223351798

@RequestHeader(获取请求头)

1
2
3
4
5
6
7
8
9
10
11
12
@GetMapping("/car/{id}/owner/{username}")
public Map<String,Object> getCar(@PathVariable("id") Integer id,
@PathVariable("username") String name,
@RequestHeader Map<String,String> header,
@RequestHeader Map<String,String> rh,
@RequestHeader("User-Agent") String UserAgent//Use-Agent是请求头中的属性
){
Map<String,Object> map=new HashMap<>();
map.put("id",id);
map.put("name",name);
map.put("rh",rh);
return map;

输出结果为

image-20221009223941763

@RequestParam(获取请求参数)

1
2
3
4
5
6
7
8
9
10
11
12
13
14
15
16
17
18
19
20
21
    @GetMapping("/car/{id}/owner/{username}")
public Map<String,Object> getCar(
// @PathVariable("id") Integer id,
// @PathVariable("username") String name,
// @RequestHeader Map<String,String> header,
// @RequestHeader Map<String,String> rh,
// @RequestHeader("User-Agent") String UserAgent
@RequestParam("age") Integer age,
@RequestParam("inters") List<String> inters,
@RequestParam Map<String,String> rp

){
Map<String,Object> map=new HashMap<>();
// map.put("id",id);
// map.put("name",name);
// map.put("rh",rh);
map.put("age",age);
map.put("inters",inters);
map.put("ParamMap",rp);
return map;
}

image-20221009224248930

@CookieValue(获取cookie值)

@RequestAttribute(获取request域属性):、

本次举例为请求的转发,运用了两种方法,第一种转发request_msg是用传统的HttpServletRequest.getAttribute方法获取域值另一种方法是用注解的方法调用msg

1
2
3
4
5
6
7
8
9
10
11
12
13
14
15
16
17
18
19
20
@Controller
public class RequestController {
@GetMapping("/goto")
public String GoToPage(HttpServletRequest request){
request.setAttribute("msg","成功啦");
request.setAttribute("code",200);
return "forward:/success";//转发到success请求
}
@ResponseBody
@GetMapping("/success")
public Map success(@RequestAttribute String msg,
@RequestAttribute Integer code,
HttpServletRequest request){
Object msg1 = request.getAttribute("msg");
Map<String,Object> map=new HashMap<>();
map.put("request_msg",msg1);
map.put("annotation_msg",msg);
return map;
}
}

输出结果为

image-20221009231208558

@RequestBody(获取请求体):获取表单中的内容

1
2
3
4
5
6
@PostMapping("/save")
public Map postMethod(@RequestBody String content){
Map<String,Object> map=new HashMap<>();
map.put("content",content);
return map;
}

前端代码为

1
2
3
4
5
6
<form action="/save" method="post">
测试@RequestBody获取数据<br/>
用户名:<input name="userName"/><br>
邮箱:<input name="email">
<input type="submit" value="提交"/>
</form>

输出结果为image-20221009225537266

7、MybaitsPlus

主要功能:代码生成器

1
2
3
4
5
6
7
8
9
10
11
12
13
14
15
16
17
18
19
20
21
22
23
24
25
26
27
28
29
30
31
package com.example.boot.common;

import com.baomidou.mybatisplus.generator.FastAutoGenerator;
import com.baomidou.mybatisplus.generator.config.OutputFile;
import com.baomidou.mybatisplus.generator.engine.FreemarkerTemplateEngine;

import java.util.Collections;

public class Generator {
public static void main(String[] args){
String localpath="D:/1575443749/java/";
FastAutoGenerator.create("jdbc:mysql://localhost:3306/mybatis", "root", "root")
.globalConfig(builder -> {
builder.author("zhangfeng") // 设置作者
// .enableSwagger() // 开启 swagger 模式
.fileOverride() // 覆盖已生成文件
.outputDir(localpath+"demo12/src/main/java"); // 指定输出目录
})
.packageConfig(builder -> {
builder.parent("com.example") // 设置父包名
.moduleName("boot") // 设置父包模块名
.pathInfo(Collections.singletonMap(OutputFile.xml, localpath+"demo12/src/main/resources/mapper")); // 设置mapperXml生成路径
})
.strategyConfig(builder -> {
builder.addInclude("tb_user") // 设置需要生成的表名
.addTablePrefix("tb_"); // 设置过滤表前缀
})
.templateEngine(new FreemarkerTemplateEngine()) // 使用Freemarker引擎模板,默认的是Velocity引擎模板
.execute();
}
}

8、thymeleaf

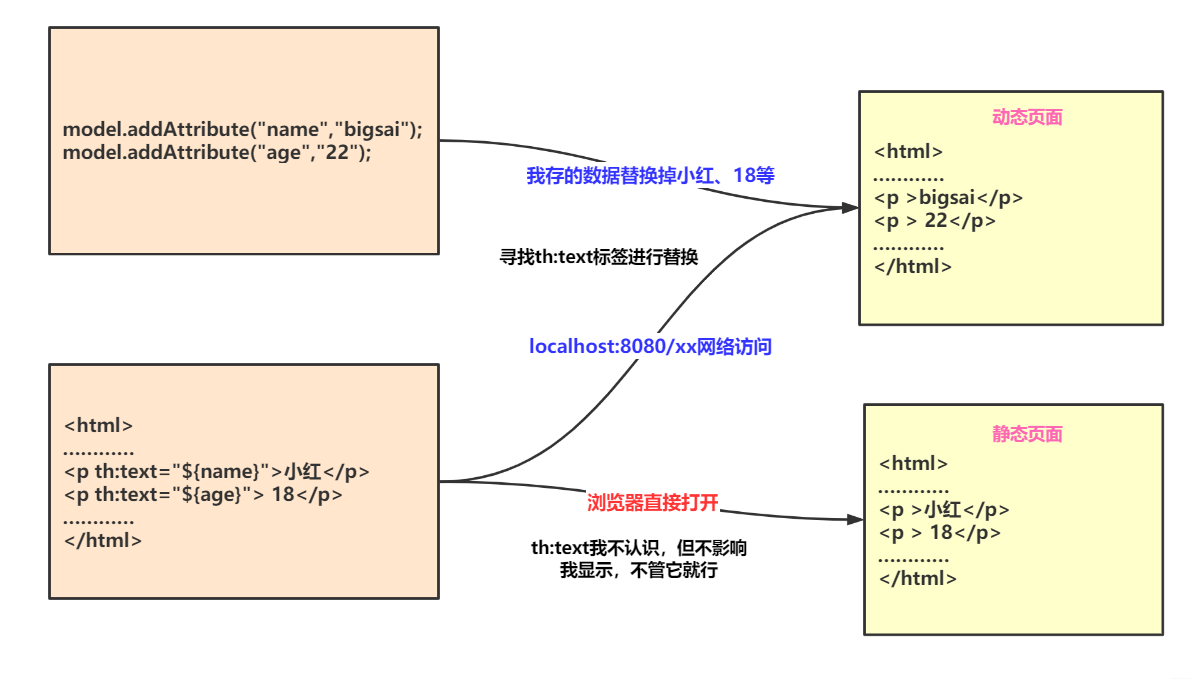
Thymeleaf是适用于Web和独立环境的现代服务器端Java模板引擎

模板引擎(这里特指用于Web开发的模板引擎)是为了使用户界面与业务数据(内容)分离而产生的,它可以生成特定格式的文档,用于网站的模板引擎就会生成一个标准的html文档。从字面上理解模板引擎,最重要的就是模板二字,这个意思就是做好一个模板后套入对应位置的数据,最终以html的格式展示出来,这就是模板引擎的作用。
对于模板引擎的理解,可以这样形象的做一个类比:开会! 相信你在上学初高中时候每次开会都要提前布置场地、拿小板凳、收拾场地。而你上了大学之后每次开会再也不去大操场了,每次开会都去学校的大会议室,桌子板凳音响主席台齐全,来个人即可,还可复用……。模板引擎的功能就类似我们的会议室开会一样开箱即用,将模板设计好之后直接填充数据即可而不需要重新设计整个页面。提高页面、代码的复用性。
在这里插入图片描述

接表达式: @{…}

变量表达式: ${…}

取List集合(each):
因为List集合是个有序列表,里面内容可能不止一个,你需要遍历List对其中对象取值,而遍历需要用到标签:th:each,具体使用为

Thymeleaf的另外一个强大功能:提取公共页面

将一些公共代码放入一个普通的HTML页面(common.html)

方法一:然后用div标签将公共代码嵌套,然后设置id=XXX

引用时要时用div标签 th: replace| insert | include

  • th:insert :保留自己的主标签,保留th:fragment的主标签。
  • th:replace :不要自己的主标签,保留th:fragment的主标签。
  • th:include :保留自己的主标签,不要th:fragment的主标签。

举例:

1
2
3
4
5
6
<body>
<footer class="main-footer" th:fragment="footer">
<strong>Copyright &copy; 2019-2020 <a href="http://www.zhangligong.xyz/">FishLeap</a>.</strong>
All rights reserved.
</footer>
</body>

在其它html页面中引入某html页面的fragment

1
2
3
4
5
<div th:insert="footerbar :: footer"></div>

<div th:replace="footerbar :: footer"></div>

<div th:include="footerbar :: footer"></div>

结果为:

1
2
3
4
5
6
7
8
9
10
11
12
13
14
15
16
17
<div>
<footer class="main-footer" >
<strong>Copyright &copy; 2019-2020 <a href="http://www.zhangligong.xyz/">FishLeap</a>.</strong>
All rights reserved.
</footer>
</div>

<footer class="main-footer" >
<strong>Copyright &copy; 2019-2020 <a href="http://www.zhangligong.xyz/">FishLeap</a>.</strong>
All rights reserved.
</footer>

<div>
<strong>Copyright &copy; 2019-2020 <a href="http://www.zhangligong.xyz/">FishLeap</a>.</strong>
All rights reserved.
</div>

9、拦截器

若使用拦截器首先要清楚拦截器的拦截位置:preHandle(目标方法执行前进行拦截),postHandle(目标方法执行后拦截),afterCompletion(页面渲染后拦截)

使用拦截器要实现HandlerInterceptor接口,重写其中的上述三个位置的方法 返回结果为 true就是放行 ,false就是拦截

1
2
3
4
5
6
7
8
9
10
11
12
13
14
15
16
 public class LoginInterceptor  implements HandlerInterceptor {
@Override
public boolean preHandle(HttpServletRequest request, HttpServletResponse response, Object handler)
throws Exception {
//目标方法方法执行前
HttpSession session = request.getSession();
Object loginUser = session.getAttribute("LoginUser");
if(loginUser!=null){
//放行
return true;
}
//拦截
request.setAttribute("msg","请先登录");
request.getRequestDispatcher("/").forward(request,response);
return false;
}

然后要进行对拦截器的配置:

首先要实现WebMvcConfigurer接口,其中接口中有方法添加拦截器addInterceptors(InterceptorRegistry registry)

InterceptorRegistry 为拦截器注册表其中有方法

1
2
3
4
5
6
7
8
9
@Configuration
public class adminWebConfig implements WebMvcConfigurer {
@Override
public void addInterceptors(InterceptorRegistry registry) {
registry.addInterceptor(new LoginInterceptor())//添加拦截器
.addPathPatterns("/**")//拦截范围
.excludePathPatterns("/","/login","/css/**","/fonts/**","/js/**","/images/**");//放行范围
}
}

10、javaweb的一些知识点回顾

web开发中的四个域:

page,request,session,application

生命周期:就是值对象的创建到销毁的期间。

page:jsp页面被执行,生命周期开始,jsp页面执行完毕,声明周期结束

request:用户发送一个请求,开始,服务器返回响应,请求结束,生命周期结束

session:用户打开浏览器访问,创建session(开始),session超时或被声明失效,该对象生命周期结束

application:web应用加载的时候创建。Web应用被移除或服务器关闭,对象销毁。

四个域对象的选择标准

page:数据只是暂时存在集合,在jsp页面的其他地方要用,用page(页面中自定义的map)

​ (什么时候需要用map了,就用page)

Request:数据只是做显示的,看完了就没用了。就存request域,请求转发,Servlet产生的处理结果(数据)交给jsp显示。 数据转发可以带数据。

Session:数据给用户看完了,一定还要用,会话结束了就没用了

​ 用户登录,用户信息发给客户端看,看完了,一会访问别的页面还要看用户信息。

​ 购物车,购物车成功了,给用户看购物车,待会随时间可以查看购物车

​ 请求重定向,因为是两次请求,每一次请求的数据,第二次请求还要看。

application:数据给一个用户用完了,别人还要用

​ 聊天室,聊天记录,需要给所有的用户看

​ 统计网站在线人数,所有看到的应该是一个数

请求转发和重定向(转发是服务器行为,重定向是客户端行为)
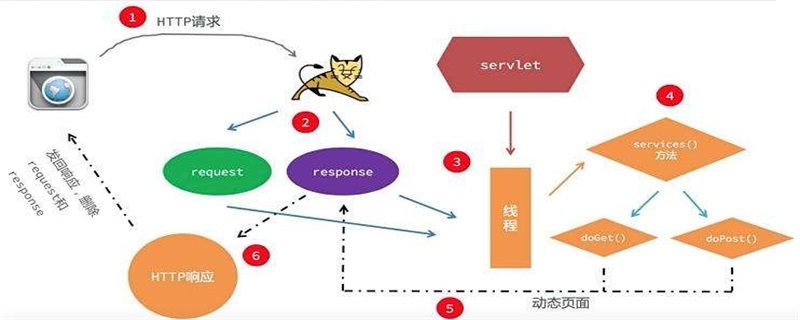
Servlet生命周期

如上图就是Servlet的生命周期

请求转发和重定向用通俗的方式来讲就是

假设你去办理某个执照,

重定向:你先去了A局,A局的人说:“这个事情不归我们管,去B局”,然后,你就从A退了出来,自己乘车去了B局。(访问了两次服务器,第一次访问A,第二次访问B,URL变化了)

转发:你先去了A局,A局看了以后,知道这个事情其实应该B局来管,但是他没有把你退回来,而是让你坐一会儿,自己到后面办公室联系了B的人,让他们办好后,送了过来。(访问了一次服务器,URL未变化)

1
2
3
4
 //请求转发java代码示例
request.getRequestDispatcher("xxx.jsp或者servlet").forward(request,response)
//重定向Java代码示例
response.sendRedirect("xxx.jsp或者servlet");

请求转发的特点

请求重定向

  • 重定向,其实是两次request,
    第一次,客户端request A,服务器响应,并response回来,告诉浏览器,你应该去B。这个时候IE可以看到地址变了,而且历史的回退按钮也亮了。重定向可以访问自己web应用以外的资源。在重定向的过程中,传输的信息会被丢失。

重定向的特点

  • 址栏:显示新的地址
  • 请求次数:2次
  • 根目录:http://localhost:8080/ 没有项目的名字
  • 请求域中的数据会丢失,因为是2次请求

在这里插入图片描述

11、文件上传(单文件和多文件上传的使用)

前端html代码为:

1
2
3
4
5
6
7
8
9
10
11
12
13
14
15
16
17
18
19
20
21
22
23
24
25
26
27
28

<form th:action="@{/upload}" method="post" enctype="multipart/form-data"><!--固定写法-->
<div>
<label for="exampleInputEmail1">邮箱</label>
<input type="email" name="email" class="form-control" id="exampleInputEmail1" placeholder="Enter email">
</div>
<div >
<label for="exampleInputPassword1">名字</label>
<input type="text" name="username" id="exampleInputPassword1" placeholder="Password">
</div>
<div>
<label for="exampleInputFile">头像</label>
<input type="file" id="exampleInputFile" name="headerImg">
<p>Example block-level help text here.</p>
</div>
<div >
<label for="exampleInputFile">生活照</label>
<input type="file" name="photos" multiple><!--类型为file,添加多个文件-->
</div>
<div class="checkbox">
<label>
<input type="checkbox"> Check me out
</label>
</div>
<button type="submit">Submit</button>
</form>


对于文件的传输,我们选择的是method=”post”方法,并且表单中属性ectype=”multipart/form-data”,这是我们的固定写法,在表单元素input标签中 的type=“File”,

如果一个表单元素要传输多个文件则就在表单元素input标签最后加上 multiple

Controller层的代码为

1
2
3
4
5
6
7
8
9
10
11
12
13
14
15
16
17
18
19
@PostMapping("/upload")
public String upload(@RequestParam("email") String email,
@RequestParam("username") String username,
@RequestPart("headerImg") MultipartFile headerImg,
@RequestPart("photos") MultipartFile[] photos) throws IOException {
if(!headerImg.isEmpty()){
String originalFilename = headerImg.getOriginalFilename();
headerImg.transferTo(new File("D:\\cache\\"+originalFilename));
}
if(photos.length>0){
for (MultipartFile photo:photos){
if(!photo.isEmpty()){
String originalFilename1 = photo.getOriginalFilename();
photo.transferTo(new File("D:\\cache\\" + originalFilename1));
}
}
}
return "main";
}

其中@RequestParty用在multipart/form-data表单提交请求的方法上,支持的请求方法的方式MultipartFile,属于Spring的MultipartResolver类。这个请求是通过http协议传输的,@RequestPart适用于复杂的请求域(像JSON,XML)

MultipartFile类为复杂的文件类,倘若传递的是多个文件(multiple)则用MultipartFile[ ],MultipartFile中有一个方法为getOriginalFilename(),用于获取该文件的名称,

transferTO(File),代表将文件加载到哪里

12、错误处理

1、自定义处理页

在静态资源的templates包下创建名称为error的包其中创建4xx.html 或5xx.html文件,出现4xx(例如401,400,402)异常时,就会返回页面4xx,html

2、全局异常处理

@ControllerAdvice :

首先,ControllerAdvice本质上是一个Component,因此也会被当成组建扫描,一视同仁,扫扫扫,说白了,就是aop思想的一种实现,你告诉我需要拦截规则,我帮你把他们拦下来,具体你想做更细致的拦截筛选和拦截之后的处理,你自己通过@ExceptionHandler@InitBinder@ModelAttribute这三个注解以及被其注解的方法来自定义。

我们主要用的是@ExceptionHandler来处理,@ExceptionHandler(IllegalArgumentException.class),则表明此方法处理

IllegalArgumentException 类型的异常,如果参数为空,将默认为方法参数列表中列出的任何异常(方法抛出什么异常都接得住)

1
2
3
4
5
6
7
@ControllerAdvice
public class GlobalExceptionHandler {

@ExceptionHandler({ArithmeticException.class,NullPointerException.class}) //异常处理器
public String handleArithException(Exception e){
return "login";//视图地址
}

3、局部异常处理

@ResponseStatus 有三个属性 value:Http状态码 如HttpStatus.FORBIDDEN的String类型 就是Http状态码403

​ code:Http状态码

​ reason:报告错误信息

若单独使用或搭配@ControllerAdvice使用会返回

UserToManyException类为

1
2
3
4
5
6
7
8
@ResponseStatus(value = HttpStatus.FORBIDDEN,reason = "用户数量太多")
public class UserToManyException extends RuntimeException{
public UserToManyException(String message){
super(message);
}
public UserToManyException() {
}
}

异常处理为

1
2
3
4
5
6
7
8
9
10
11
12
13
14
@GetMapping("/dynamic_table")
public String dynamic_table(Model model){
//遍历表单内容
List<User> users = Arrays.asList(new User("张三", "123456"),
new User("李四", "123444")
, new User("王五", "aaaa"),
new User("老六", "66666"),
new User("haha", "123456"));
model.addAttribute("users",users);
if(users.size()>3){
throw new UserToManyException();
}
return "table/dynamic_table";
}

当我们请求时会报错结果为:

image-20221017213857019

4、自定义异常解析器

我们创建一个异常解析器类CustomerHandlerExceptionResolver

1
2
3
4
5
6
7
8
9
10
11
12
13
14
15
16
@Order(value = Ordered.HIGHEST_PRECEDENCE)//最高优先级,出现任何错误都是send中的Http状态码
@Component
public class CustomerHandlerExceptionResolver implements HandlerExceptionResolver {
@Override
public ModelAndView resolveException(HttpServletRequest request,
HttpServletResponse response,
Object handler,
Exception ex) {
try {
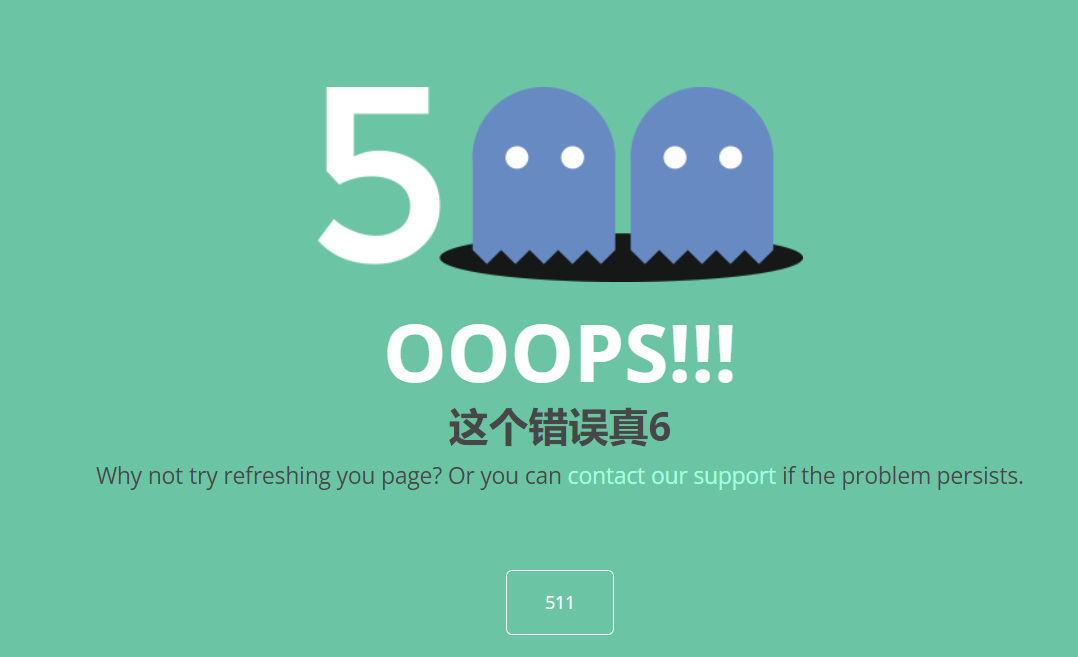
response.sendError(511,"这个错误真6");
} catch (IOException e) {
e.printStackTrace();
}
return new ModelAndView();
}
}
1
2
3
4
5
6
7
8
9
10
11
12
13
<section>
<div class="container ">

<section class="error-wrapper text-center">
<h1><img alt="" src="/images/500-error.png"></h1>
<h2>OOOPS!!!</h2>
<h3 th:text="${message}">Something went wrong.</h3><!--取出参数message,就是senderror中的"这个错误真6"-->
<p class="nrml-txt">Why not try refreshing you page? Or you can <a href="#">contact our support</a> if the problem persists.</p>
<a class="back-btn" href="../main.html" th:text="${status}"> Back To Home</a><!--取出参数状态码-->
</section>

</div>
</section>

结果为:image-20221017222632270

13、web原生组件注入(servlet、Filter、Listener)

1、使用ServletAPI

1
@ServletComponentScan("com.zhang.boot.servlet")//指定原生类组件都放在哪里
1
@WebServlet(urlPatterns = "/my")//效果:直接响应,没有经过拦截器
1
@WebListener

2、使用RegistrationBean

1
2
3
ServletRegistrationBean
FilterRegistrationBean
ServletListenerRegistrationBean

首先我们要编写我们自己的servlet、Filter、listener

然后

1
2
3
4
5
6
7
8
9
10
11
12
13
14
15
16
17
18
19
20
@Configuration(proxyBeanMethods = false)
public class MyRegistConfig {
@Bean
public ServletRegistrationBean myservlet(){
MyServlet myServlet=new MyServlet();
return new ServletRegistrationBean(myServlet,"/my","/my2");
}
@Bean
public FilterRegistrationBean myFilter(){
MyFilter myFilter=new MyFilter();
FilterRegistrationBean filterRegistrationBean = new FilterRegistrationBean(myFilter);
filterRegistrationBean.setUrlPatterns(Arrays.asList("/my","/css/*"));//设置拦截路径
return filterRegistrationBean;
}
@Bean
public ServletListenerRegistrationBean myListener(){
WebListener webListener = new WebListener();
return new ServletListenerRegistrationBean(webListener);
}
}

14、定制化原理

1、定制化常见方式

  • 修改配置文件
  • 编写自定义配置类XXXConfiguration+@Bean、添加容器中的默认组件:视图解析器(例如:用RegistrationBean添加Web三大组件)
  • web应用实现WebMvcConfigurer即可定制化web功能,再加上@Bean给容器再扩展一些组件

​ 例如我们添加拦截器

1
2
3
4
5
6
7
8
9
@Configuration
public class adminWebConfig implements WebMvcConfigurer {
@Override
public void addInterceptors(InterceptorRegistry registry) {
registry.addInterceptor(new LoginInterceptor())
.addPathPatterns("/**")
.excludePathPatterns("/","/login","/css/**","/fonts/**","/js/**","/images/**");
}
}
  • @EnableWebMvc+WebMvcConfigurer——@Bean可以全面接管SpringMVC,所有规则全部自己重新配置;实现定制和拓展功能

原理:

  1. WebMvcAutoConfiguration 默认的SpringMVC自动配置功能类。静态资源、欢迎页……
  2. 一旦使用@EnableWebMvc 会@Import(DelegatingWebMvcConfiguration.class)
  3. DelegatingWebMvc的作用,只能保证SpringMVC 最基本的使用
    • 把所有系统中WebMvcConfigurer拿过来。所有功能的定制都是这些WebMvcConfigurer合起来一起生效
    • 自动配置了一些非常底层的组件。RequestMappingHandlerMapping这些组件依赖的组件都在容器中获取
  4. WebMvcConfiguration里面的配置要能生效必须@(ConditionalOnMissingBean(“WebMvcConfigurationSupport.class”))而DelegatingWebMvc继承了WebMvcConfigurationSupport
  5. @EnableWebMvc导致了WebMvcConfiguration没有生效

15、数据访问

1、SQL

  1. 数据源的自动配置 -hikarDataSource

    1. JDBC场景
    1
    2
    3
    4
    <dependency>
    <groupId>org.springframework.boot</groupId>
    <artifactId>spring-boot-starter-data-jdbc</artifactId>
    </dependency>
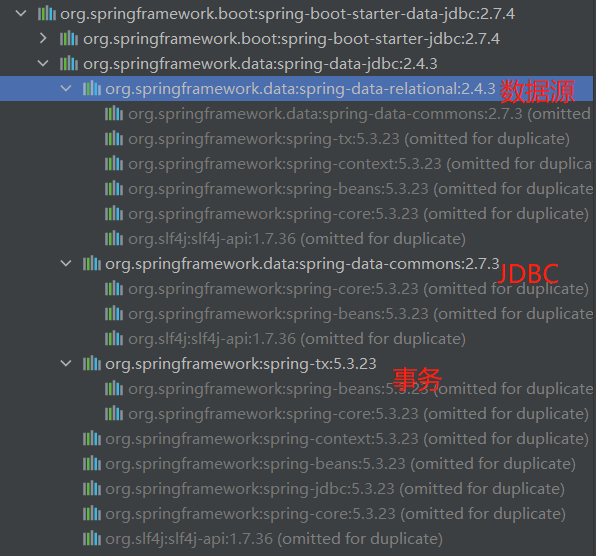
    image-20221019153748665

没导入数据驱动?

因为不知道我们接下来要操作什么数据库

接下来导入数据库驱动

1
2
3
4
5
6
7
8
<dependency>
<groupId>mysql</groupId>
<artifactId>mysql-connector-java</artifactId>
</dependency>

SpringBoot start中 默认的版本号为
<version>8.0.30</version>

2、分析自动配置

  • DataSourceAutoConfigur数据源自动配置
    • 若要修改数据库相关配置就要在配置文件中增加前缀“spring.datasource”
    • 数据库连接池配置,是自己容器中没有DataSource才自动配置的
    • 底层配置好的连接池是hikarDataSource
  • DataSourceTransactionManagerAutoConfiguration 数据源事务管理自动配置
  • JdbcTemplateAutoConfiguration JDBCTemplate的自动配置,可以用来对数据库进行crud
    • 可以修改这个配置项@ConfigurationProperties(prefix=”spring.jdbc”) 来修改 JdbcTemplate
  • JndiDataSourceAutoConfiguration jndi自动配置
  • XADataSourceAutoConfiguration 分布式事务相关的

3、修改配置项

1
2
3
4
5
spring:
datasource:
url: jdbc:mysql://localhost:3306/mybatis
username: root
password: root

2、使用Druid数据源

1、druid官方github地址

http://github.com/alibaba/druid

整合第三方技术两种方式

  • 自定义

    ​ 首先先创建数据源,数据源中的方法例如添加URL,UserName,Password等属性,但如果配置文件中有这些描述,那么就利用注解@ConfigurationProperties(“spring.datasource”)进行添加,若要使用监控功能,那么就用DruidDataSource().setFilters(“stat”)

    再配置druid控制页功能,使用RegistrationBean注册statViewServletRegistrationBean随后传入新statViewServlet与/druid/* 访问路径

1
2
3
4
5
6
7
8
9
10
11
12
13
14
15
16
17
18
19
20
21
22
23
@Configuration
public class MyDataSourceConfig {
//ConditionalOnMissBean(DataSource.class) 容器中没有DataSource才会配置默认配置Hikari数据源
@ConfigurationProperties("spring.datasource")
@Bean
public DataSource DataSource() throws SQLException {
DruidDataSource druidDataSource=new DruidDataSource();
//加入监控功能
druidDataSource.setFilters("stat");
return druidDataSource;
}
/**
* 配置druid监控页功能
* **/
@Bean
public ServletRegistrationBean statViewServlet(){

StatViewServlet statViewServlet = new StatViewServlet();
ServletRegistrationBean<StatViewServlet> statViewServletRegistrationBean =
new ServletRegistrationBean<>(statViewServlet, "/druid/*");
return statViewServletRegistrationBean;
}
}

Controller层代码为

1
2
3
4
5
6
@ResponseBody
@GetMapping("/sql")
public String QueryFromb(){
Long aLong=jdbcTemplate.queryForObject("select count(*) from tb_user",long.class);
return aLong.toString();
}

image-20221020015258515

还可以向其中加入防火墙

1
2
3
4
5
6
7
8
public FilterRegistrationBean webstatFilter(){
WebStatFilter webStatFilter=new WebStatFilter();
FilterRegistrationBean<WebStatFilter> filterFilterRegistrationBean =
new FilterRegistrationBean<WebStatFilter>(webStatFilter);
filterFilterRegistrationBean.setUrlPatterns(Arrays.asList("/*"));
filterFilterRegistrationBean.addInitParameter("exclusions","*.js,*.jpg,*.gif,*.css,*.ico,/druid/,*.png");
return filterFilterRegistrationBean;
}

再向数据源的setFilter方法中由原来的setFilter(“stat”)转为(“stat,wall”)

不仅如此,在监控页面中也能设置登录的账号密码

在监控器对象中调用

addInitParameter("loginUsername","admin") ,addInitParameter("loginPassword","123456")

  • 找starterxx

    导入druid-starter

    1
    2
    3
    4
    5
    <dependency>
    <groupId>com.alibaba</groupId>
    <artifactId>druid-spring-boot-starter</artifactId>
    <version>1.2.11</version>
    </dependency>

    分析自动配置

    • 扩展配置项 spring.datasource.druid

    • ```java
      @Import({DruidSpringAopConfiguration.class,//监控springBean的 配置项spring.datasource.druid.aop-patterns
      DruidStatViewServletConfiguration.class,//监控页的配置都 配置项spring.datasource.druid.stat-view-servlet 默认开启
      DruidWebStatFilterConfiguration.class, //web监控配置 Springspring.datasource.druid.web-stat-filter 默认开启
      DruidFilterConfiguration.class}
      private static final String FILTER_STAT_PREFIX = “spring.datasource.druid.filter.stat”;
      private static final String FILTER_CONFIG_PREFIX = “spring.datasource.druid.filter.config”;
      private static final String FILTER_ENCODING_PREFIX = “spring.datasource.druid.filter.encoding”;
      private static final String FILTER_SLF4J_PREFIX = “spring.datasource.druid.filter.slf4j”;
      private static final String FILTER_LOG4J_PREFIX = “spring.datasource.druid.filter.log4j”;
      private static final String FILTER_LOG4J2_PREFIX = “spring.datasource.druid.filter.log4j2”;
      private static final String FILTER_COMMONS_LOG_PREFIX = “spring.datasource.druid.filter.commons-log”;
      private static final String FILTER_WALL_PREFIX = “spring.datasource.druid.filter.wall”;
      private static final String FILTER_WALL_CONFIG_PREFIX = “spring.datasource.druid.filter.wall.config”;
      //所有druid自己Filter配置

      1
      2
      3
      4
      5
      6
      7
      8
      9
      10
      11
      12
      13
      14
      15
      16
      17
      18
      19
      20
      21
      22
      23
      24
      25
      26
      27
      28
      29
      30
      31
      32
      33


      ```yaml
      spring:
      datasource:
      url: jdbc:mysql://localhost:3306/mybatis
      username: root
      password: root
      driver-class-name: com.mysql.cj.jdbc.Driver
      druid:
      aop-patterns: com.zhang.boot.* #监控哪些包下的spring
      filters: stat,wall
      # 开启多少个功能组件
      stat-view-servlet:
      enabled: true #是否开启监控功能
      login-username: admin #登录druid页的用户名
      login-password: 123456 #登录druid页的代码
      reset-enable: false #是否允许重置数据
      filter:
      stat:
      slow-sql-millis: 1000 #超过1000ms的查询都是慢查询
      log-slow-sql: true #是否开启慢查询日志
      enabled: true #是否开启监听器
      wall:
      enabled: true #是否开启防火墙
      config:
      drop-table-allow: false #不被允许产出表

      web-stat-filter:
      enabled: true #开启监听web的功能
      url-pattern: /* #映射地址,所统计的web请求
      exclusions: "*.js,*.gif,*.jpg,*.png,*.css,*.ico,/druid/*" #不统计的web请求

3、springboot整合mybatis

导入依赖

1
2
3
4
5
<dependency>
<groupId>org.mybatis.spring.boot</groupId>
<artifactId>mybatis-spring-boot-starter</artifactId>
<version>2.2.1</version>
</dependency>

mybatis-spring-boot-starter的包结构为

image-20221020144501102

1、配置模式

  • 全局配置文件
  • sqlsessionFactory【已经配置好了】

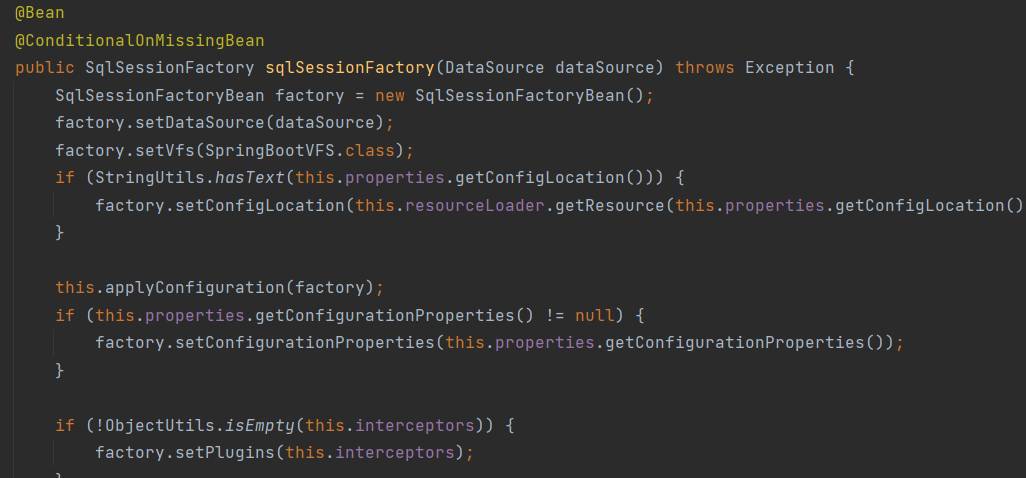
image-20221020145756572

  • SqlSession【配置好了SqlSessionTemplate】
1
2
3
4
5
6
@Bean
@ConditionalOnMissingBean
public SqlSessionTemplate sqlSessionTemplate(SqlSessionFactory sqlSessionFactory) {
ExecutorType executorType = this.properties.getExecutorType();
return executorType != null ? new SqlSessionTemplate(sqlSessionFactory, executorType) : new SqlSessionTemplate(sqlSessionFactory);
}
  • Mapper【只要我们写的操作Mybatis的接口标注了Mapper接口就能被自动扫描进来 】
1
2
@EnableConfigurationProperties({MybatisProperties.class}) Mybatis配置项绑定类
@AutoConfigureAfter({DataSourceAutoConfiguration.class, MybatisLanguageDriverAutoConfiguration.class})

2、整合Mybatis-plus

导入依赖

1
2
3
4
5
<dependency>
<groupId>com.baomidou</groupId>
<artifactId>mybatis-plus-boot-starter</artifactId>
<version>3.5.2</version>
</dependency>

自动配置

  • MybatisPlusAutoConfiguration 自动配置类 MybatisPlusProperties 配置项绑定 mybatis-plus :XX 就是对Mybatis-plus的定制
  • SqlSessionFactory自动配置好
  • mapperLocations 自动配置好的。有默认值,classpath*:/mapper/**/*.xml,任意路径的Mapper包下的任意路径的xml文件都是sql映射文件
  • 容器中页自动配有SqlSessionTemplate
  • @Mapper标准接口也会被自动扫描,建议直接@MapperScan(”com.zhang.boot.mapper.CityMapper”) 批量扫描即可

优点:

  • 只需要我们的Mapper继承BaseMapper就可以拥有crud能力

Mybatis-Plus分页拦截器

首先我们创建一个MybatisConfig类把他注册到容器中,然后创建方法

1
2
3
4
5
6
7
8
9
10
11
12
13
14
15
16
@Configuration
public class MybatisConfig {

@Bean
public MybatisPlusInterceptor mybatisPlusInterceptor() {
MybatisPlusInterceptor mybatisPlusInterceptor = new MybatisPlusInterceptor();
//分页拦截器
PaginationInnerInterceptor paginationInnerInterceptor = new PaginationInnerInterceptor();
//设置请求的页面大于最大也后操作,true调回首页,flase继续请求 默认为false
paginationInnerInterceptor.setOverflow(false);
//设置最大单页数量,默认为500条,-1为不受限制
paginationInnerInterceptor.setMaxLimit(-1L);
mybatisPlusInterceptor.addInnerInterceptor(paginationInnerInterceptor);//将分页拦截器加入MybatisPlus拦截器中
return mybatisPlusInterceptor;
}
}